
If you have decided to use WordPress as your website’s CMS. Or, if you have already deployed it on your server, then you should learn about its Block Editor.
It’s the future of full site editing and how you create functional elements on WordPress-powered pages. If you’re unfamiliar with the Block Editor and its functionality, this post will cover everything you need to know before getting started.
Now, without wasting time, let’s begin with the overview.
What Is a Block Editor?
Block editor is the default editor of WordPress, which is also known as Gutenberg. Previously, when users would edit the page, they used to do it using the Classic Editor. A text-based interface allowing one to add content using HTML, just like the following:
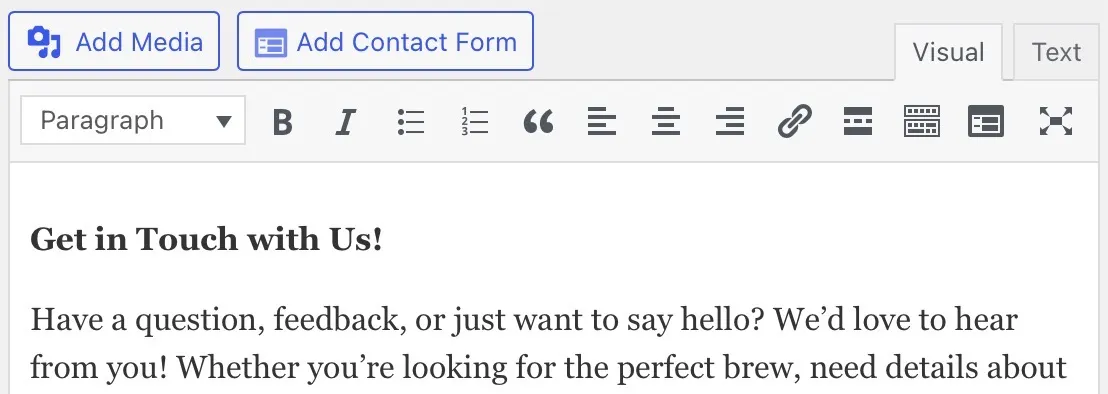
Now, it’s all changed. Rather than a text-based UI, you get blocks to create different types of web page elements.
These blocks are also called WordPress blocks, which you can insert on the page by dragging and dropping. Then, using the Block settings in the right sidebar of the editor, you can make the configuration.
Let’s look at the Gutenberg editor, aka WordPress Block Editor, closely.
The Anatomy of Gutenberg Block Editor
When you create a new page/post or edit an existing one, the WordPress block editor opens like the following:
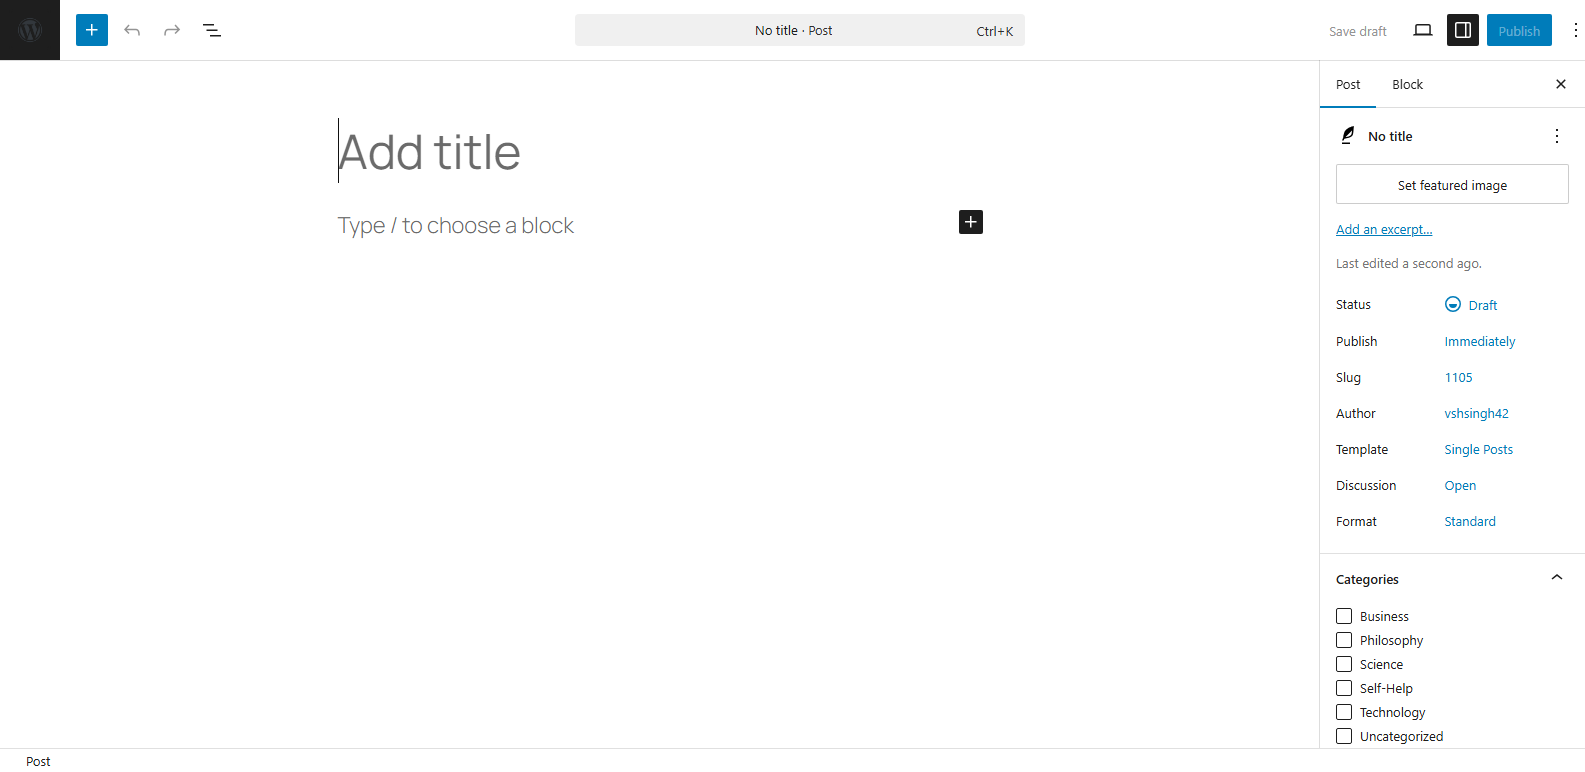
Here, you get a blank canvas ready to be filled with different blocks that you can access by clicking the ‘+’ button. As you do so, you get a library of all the blocks available in the Gutenberg editor.
To use any of the blocks, simply drag them onto the page. Or you can click on it. Once you do that, it will open the block settings in the right sidebar, allowing you to optimize the block even further.
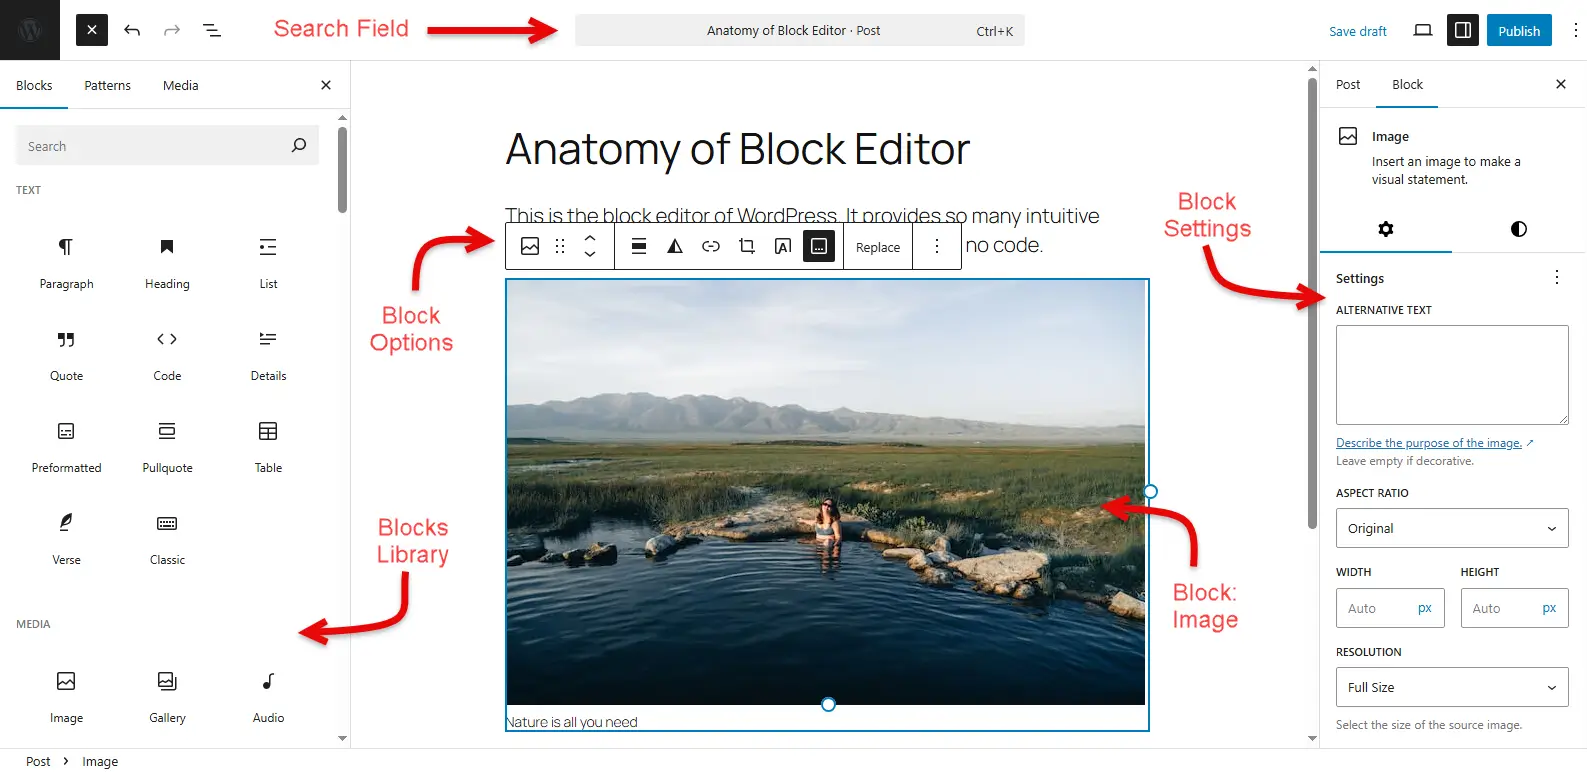
So, you have a blank canvas, then the blocks’ library on the left, block settings on the right, and above you get the search option. The right corner provides options to customize the view of your Gutenberg editor, allowing you to work effectively.
What Is the Difference Between WYSIWYG and Block Editor?
WYSIWYG means What You See Is What You Get.
This term is popular among WordPress page builders like Elementor or Divi because, when you use them, you can see what you are building in real-time.
But this phenomenon is no longer limited to those popular builders. Now, using the Gutenberg editor, you can see what you’re building and get it exactly right on the frontend when you publish the page.
Hence, WYSIWYG is the core idea of the Block Editor, and there’s no difference. Instead, it’s its specialty.
Some Common Ways to Use the WordPress Block Editor
The purpose of introducing this new WordPress Editor is to create an environment within WordPress that facilitates ease of use. You can add new pages, create new content, and customize it further, all with simple steps that require no coding.
The following are some of those actions you can take using the WordPress block editor, or you can say Gutenberg editor if you prefer.
Add a New Page
The way you add a page in WordPress hasn’t changed because of the introduction of the Gutenberg block editor. However, how you add content has been transformed by this new WordPress editor.
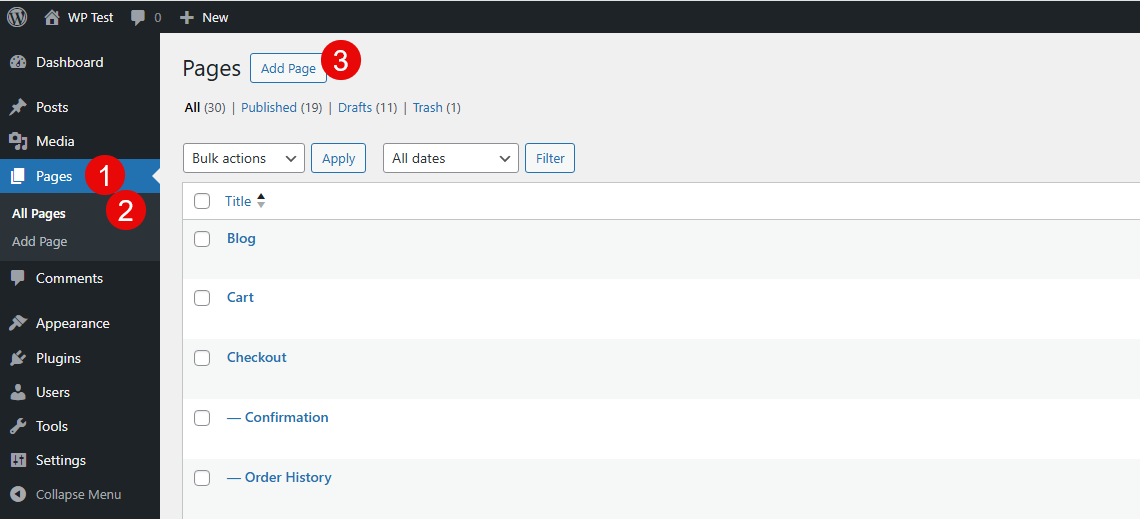
But let’s see how to add a new page in WordPress.
So, for that, you need to click on Pages → All Pages → Add Page.
Once you do that, the page will open with the Gutenberg editor like the following:
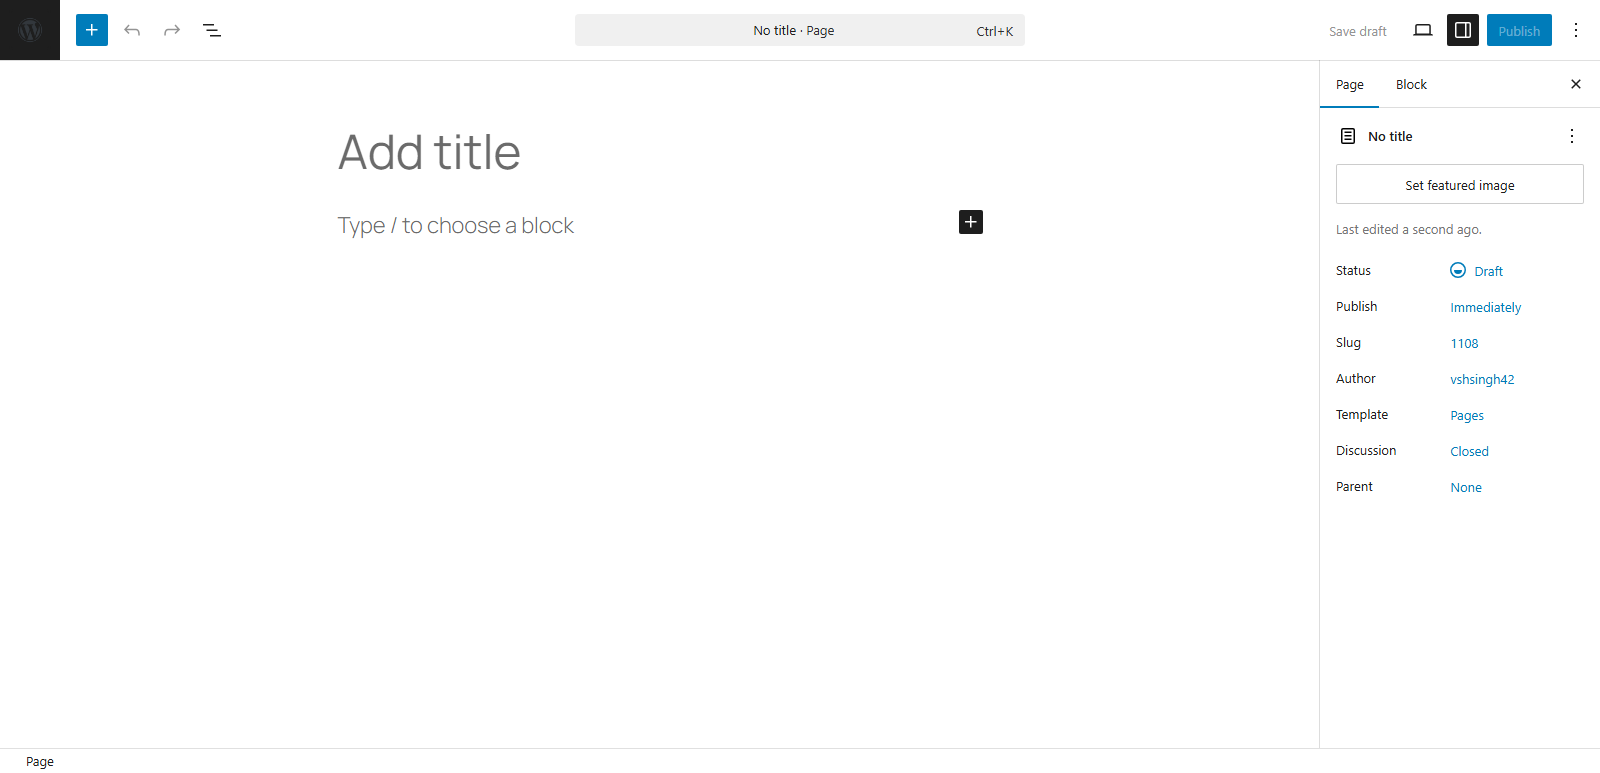
What you need to do is just add your content using the WordPress blocks available in the editor.
Add a New Post
Likewise, adding a page, the way you create a new post hasn’t changed either. You need to simply click on the Posts → All Posts → Add Post.
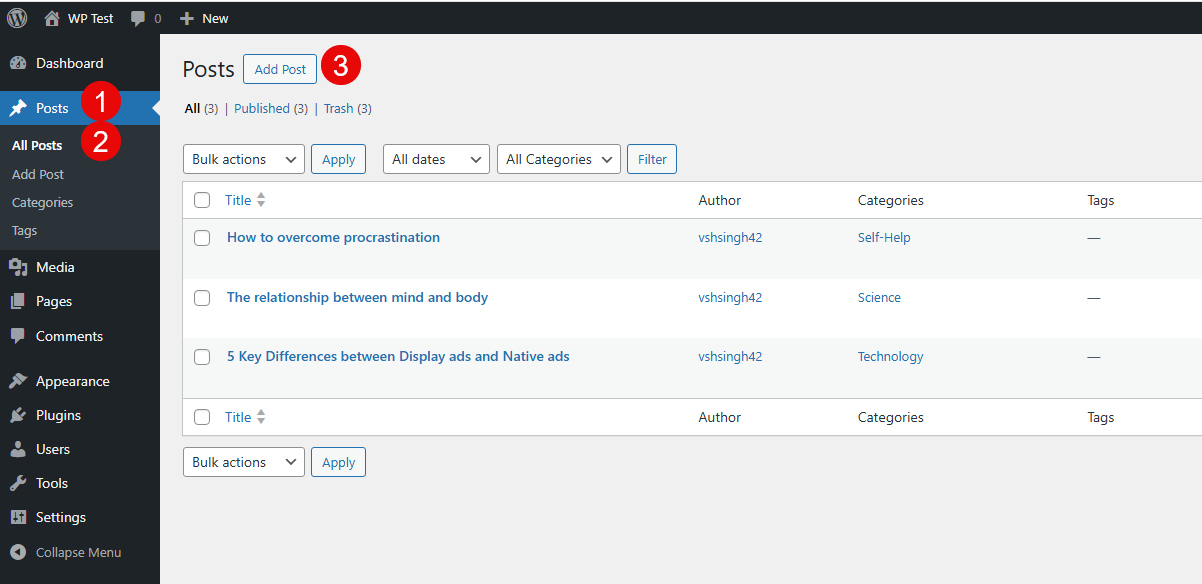
And by following the above steps, you create a new post with the block editor just like the following:
Add a Block
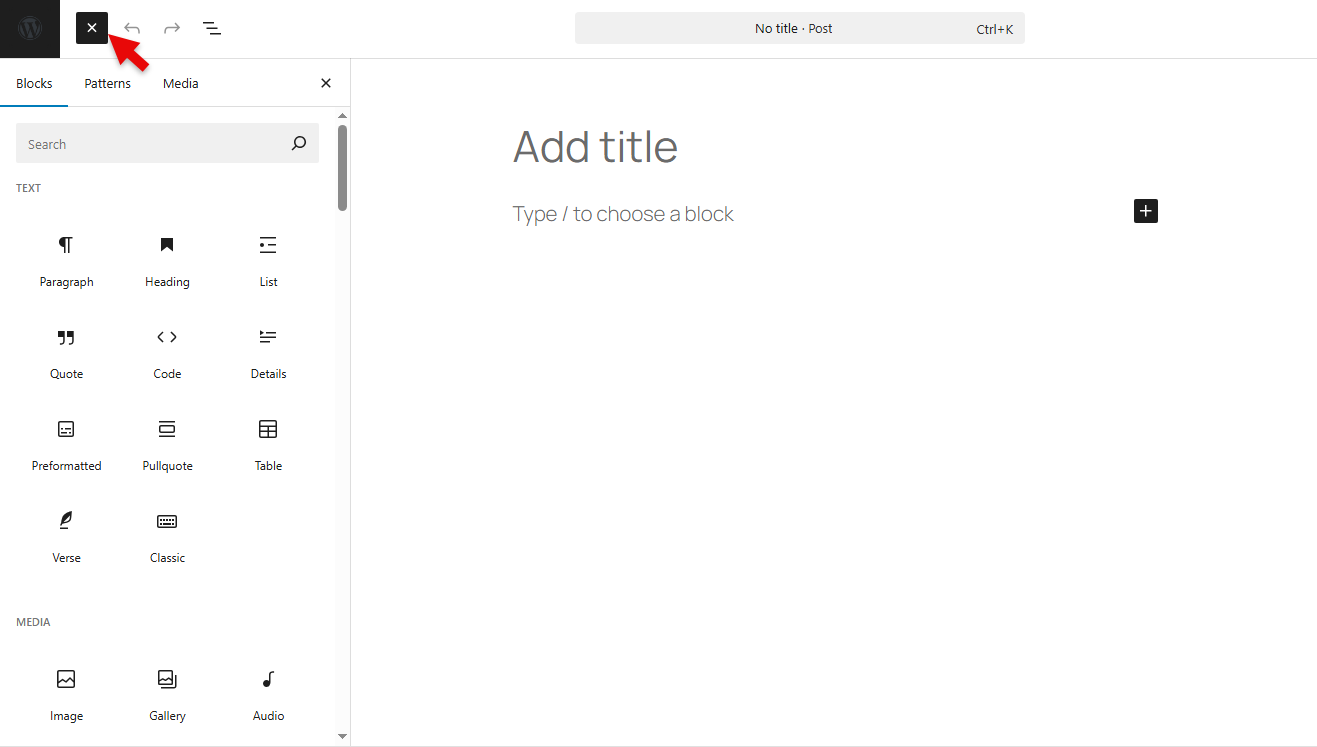
To add a block in the WordPress Gutenberg editor, simply click on the ‘+’ button in the top left corner. Or the ‘+’ sign on the page. This will open the blocks library like the following:
You can also add a block by typing / in the Gutenberg editor, and it will show you the available options.
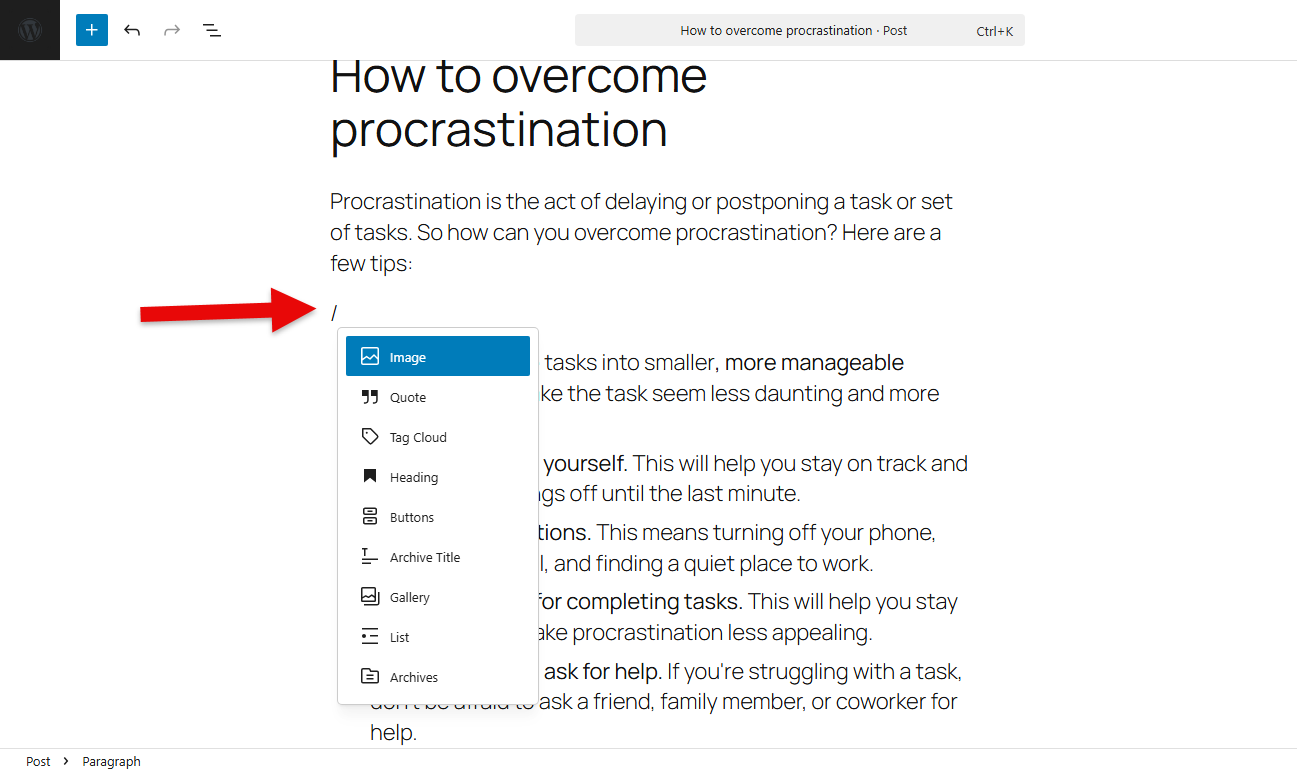
Then, to insert the block, you only need to click on it.
Customize the Block
Once you insert the block into the Gutenberg editor, you can see the Block settings in the right sidebar.
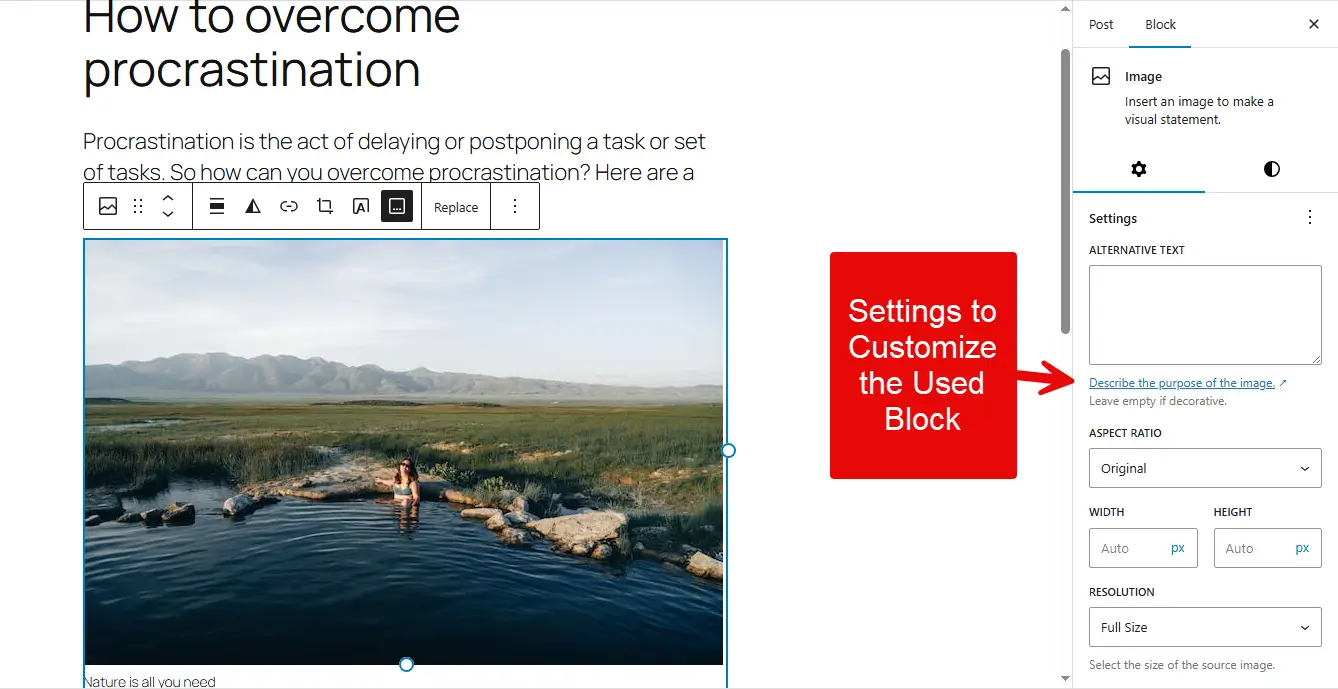
Here, based on the block you’ve added, you get the customization options. For example, you add the Quote block, then you get options such as:
- Styles
- Color
- Typography
- Dimensions
- Border
These customization options are intuitive, and you will have no issue utilizing them.
Utilize Post or Page Settings
The post or page settings in the new WordPress editor let you set featured images. Change the status of the post/page, customize the slug, author, and even the template.
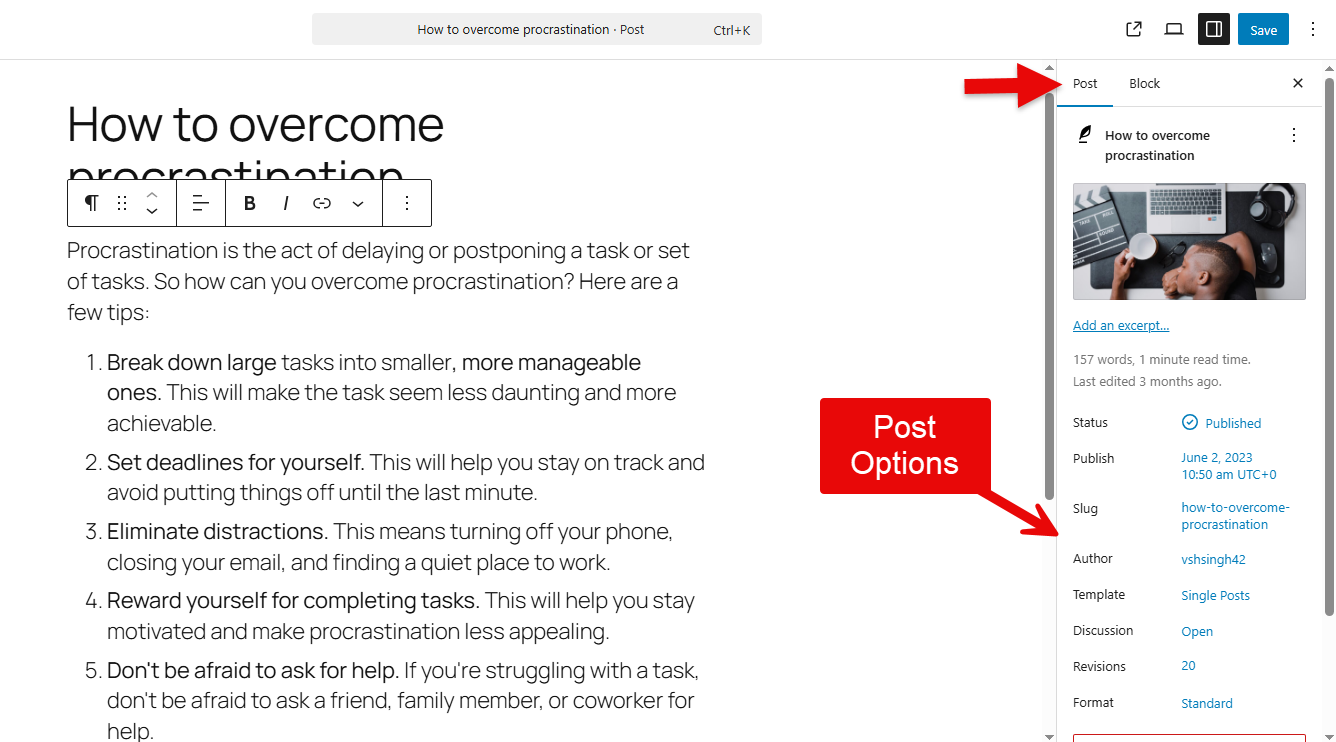
With all of these options, it becomes easier to manage what information the page/post renders and how.
Preview the Page or Post
Gutenberg editor improves the way you preview your page or post. Now, you can preview it in multiple types: Desktop, Mobile, and Tablet. You need to go to the external link on the right side of the top menu.
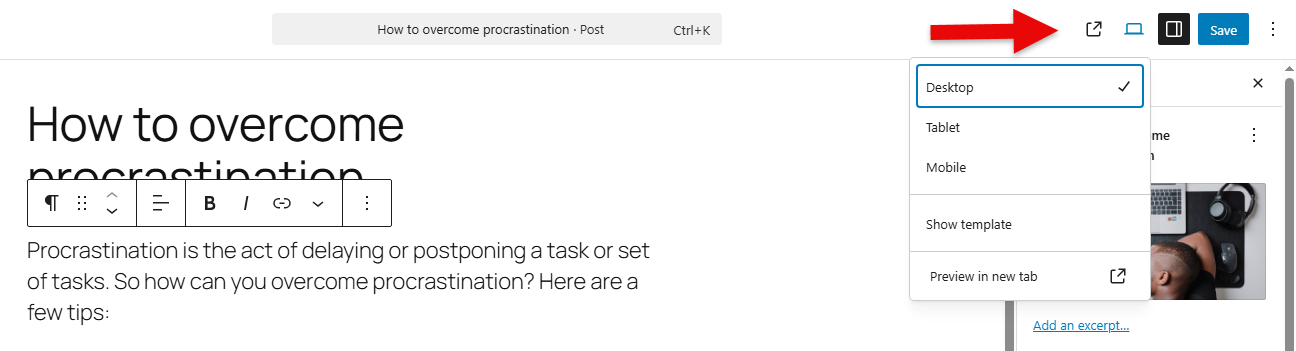
Click on it to find your preview options.
This makes the Gutenberg editor highly efficient, allowing users to view the layout and content in different modes, eliminating the need for browser inspect elements.
11 Best Tips to Effectively Use WordPress Block Editor
Want to utilize the WordPress Block Editor efficiently? Explore the following tips.
1. Organize Content and Blocks Using List View and Outline
When you access the three horizontal lines in the top left corner of the Gutenberg editor, you find the options of List View and Outline.

The list allows you to see which block you are using in the Gutenberg editor. You can also use it to reorder the blocks that you find are not in the correct order. To reorder, you simply have to drag and drop the block in the list view.
This makes it possible to change the position of your block without going through the whole document you have created.
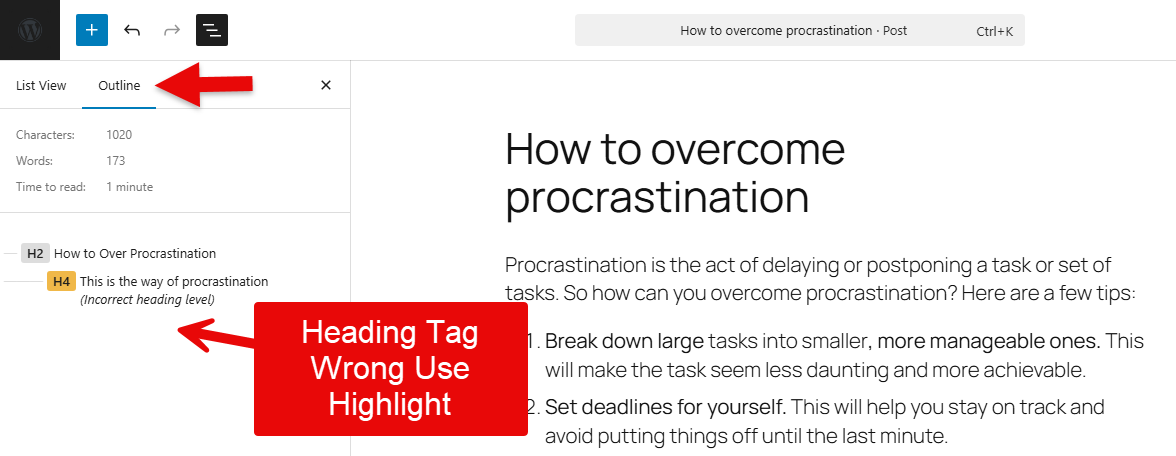
When you switch to the Outline, you can see which headings you are using and whether they are in the proper hierarchy or not. If some of the headings are not in the correct order, they will be highlighted in yellow. This allows you to simply change the heading tag to the proper hierarchy without manually checking each heading in the document.
This allows you to save time and use the Gutenberg editor efficiently.
2. Transform Blocks
Another great functionality of the Gutenberg editor is the ability to transform a particular block into another.
For some reason, you have added a heading block, but if you want to change it to a paragraph, then you simply have to click on the heading icon, and it will provide you with the option to transform the heading block into a paragraph, list, or even into a quote block.
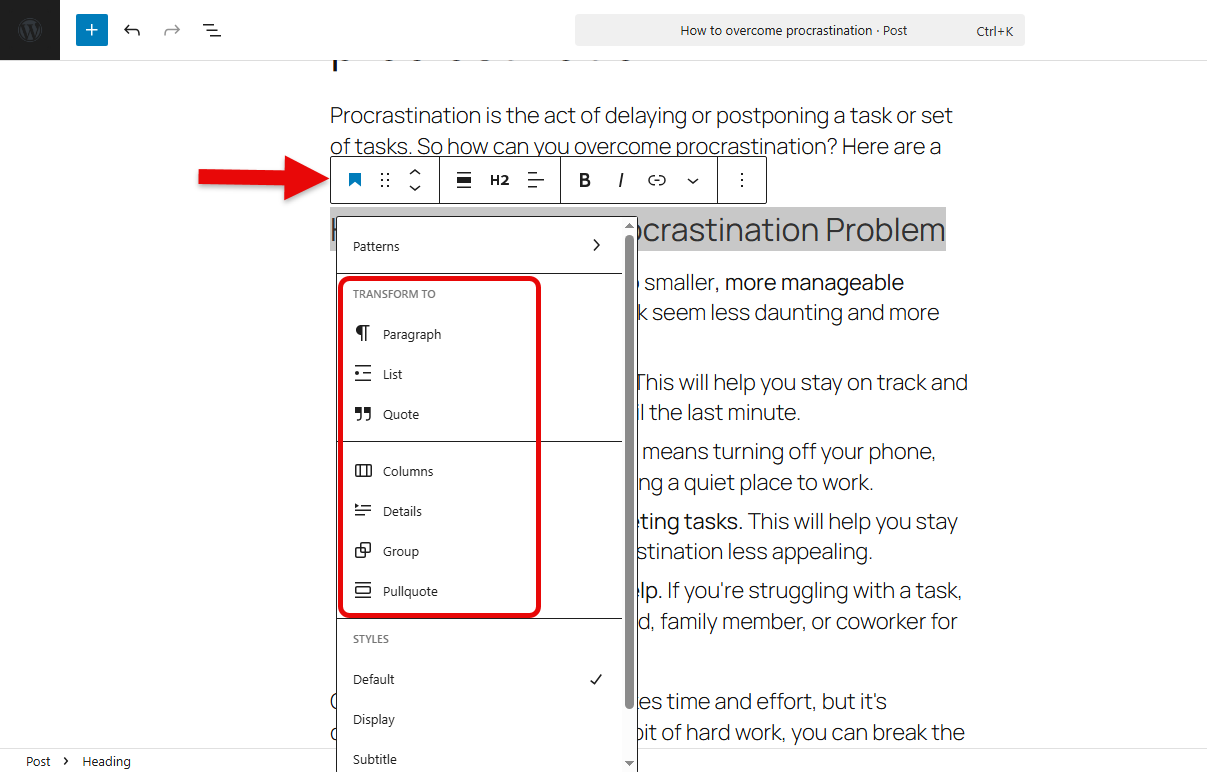
Likewise, you can transfer other blocks to the nearest possible related block. Just go to the block icon and then select the block in which you want to transform the particular block.
Once you click on it, the block will transform immediately.
3. Easy Shortcuts to Speed Up the Gutenberg Editor Use
Not only one but the Gutenberg editor provides many shortcuts to speed up and simplify its use. For example, Ctrl/command + c to copy and Ctrl/command + p to paste. Likewise, there are other shortcuts that are as follows:
- Shift + Command/Ctrl + D = Duplicate the block.
- Command/Ctrl + X = Cut.
- Alt/Option + Command/Ctrl + T = Add a paragraph block above.
- Alt/Option + Command/Ctrl + Y = Add a paragraph block below.
- Ctrl + Alt/Option + Z = Delete the block.
- Ctrl/Command + K = Enable search functionality.
4. Use the Same Styles on Multiple Blocks Using the Style Copy Option
Want to use the same style of a block on a different one? Then you can do that by simply using the Copy styles feature of the Gutenberg editor.
To access this, you need to click on the three vertical dots on the block you are using, and it will open the menu where you can see the Copy styles option.
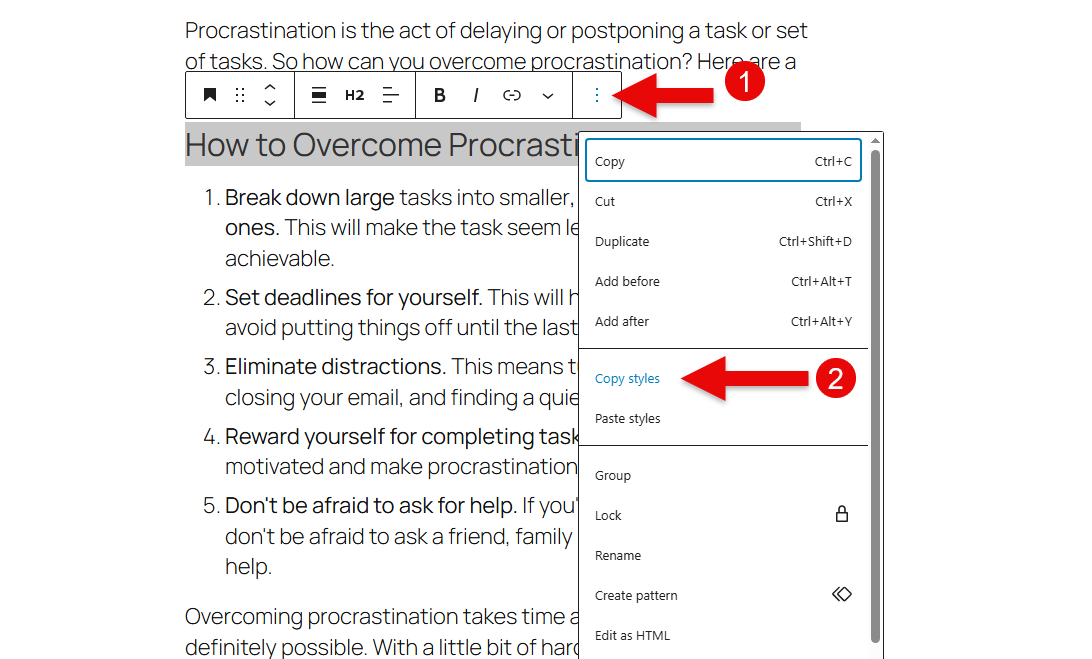
You simply have to copy, click on it, then go to the block on which you want to apply that same style.
Then click again on the three dots and click on the Paste styles option.
This will copy the styles of the previous block to the block being edited at present. This is such a simple feature that eliminates the need to repeat the same steps to create similar elements in the block editor.
5. Group Blocks and Customize Them Together
Don’t just add blocks in WordPress, but group them and style them together. Yes, the block editor of WordPress provides you with this functionality to group more than one block into a single block.
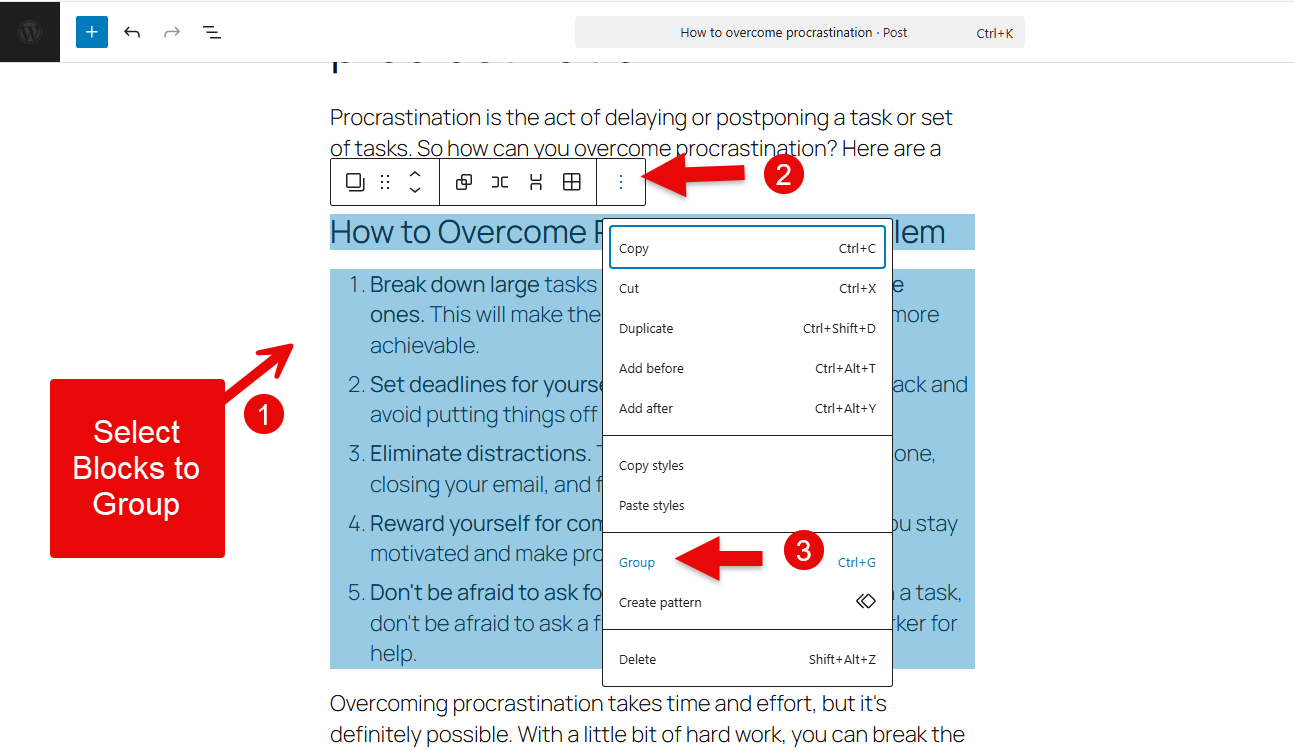
To do that, you need to first select all the blocks you want to group, then click on the three vertical dots, and then select Group. Or, you can use the Ctrl/Command + G shortcut key.
This will create your group Block.
The customisation options you get for a group Block are as follows:
- Change the group blocks container layout
- Customize layout
- Customize position
This is such an intuitive feature to show similar nature elements effectively. Or content that looks good together.
6. Protect Your Block Using the Lock Feature
While working in the Gutenberg editor, it is possible that sometimes you mistakenly edit a block or a piece of content to something you didn’t want to. So, in order to overcome this situation, the Gutenberg editor has introduced the locking feature, in which you can lock a particular block or piece of content.
To access this feature, you simply have to click on the block that you don’t want to change, then click on the three dots, and then you will find the lock feature.
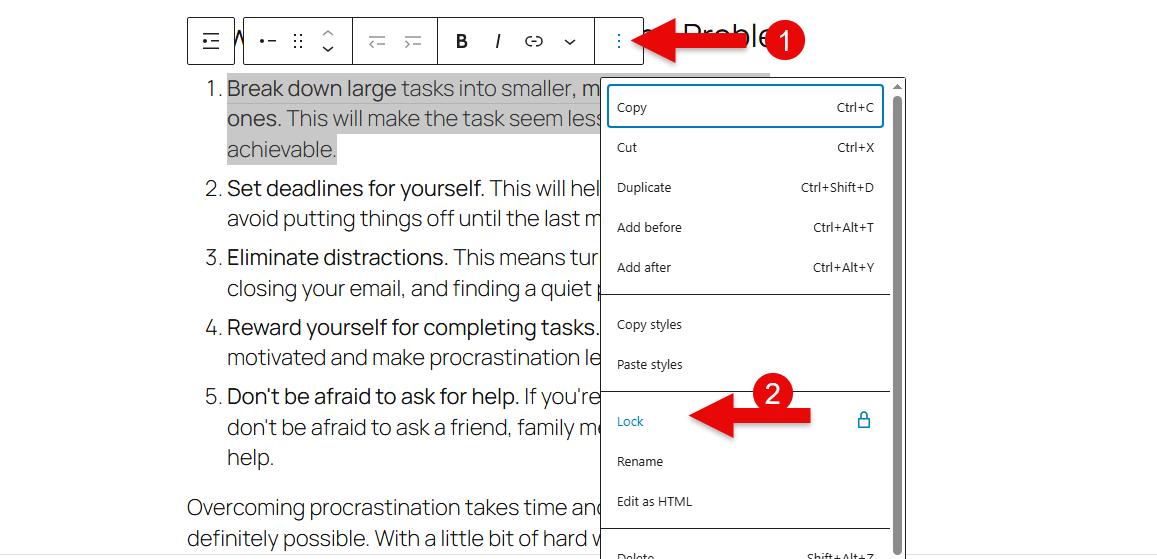
Once you click on it, you get more options, whether to Lock All, or simply Movement, or removal.
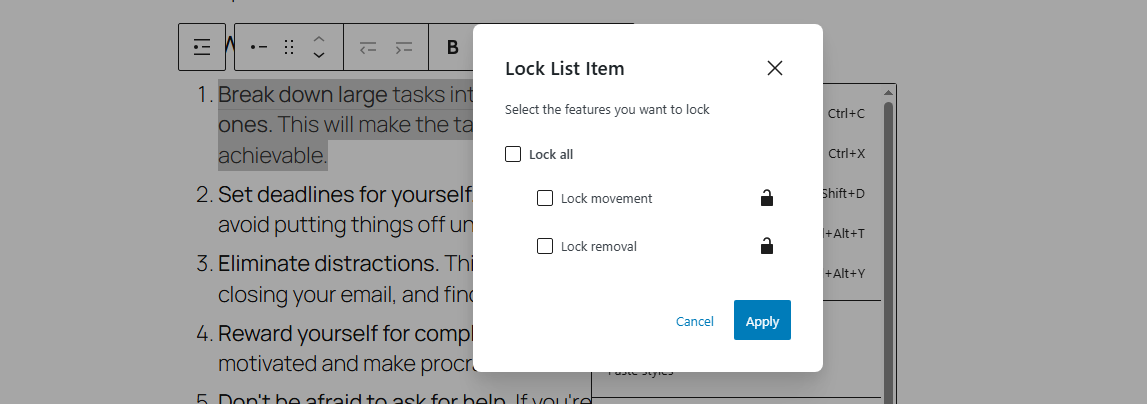
Select what you need the most out of the Lock functionality of the Gutenberg editor.
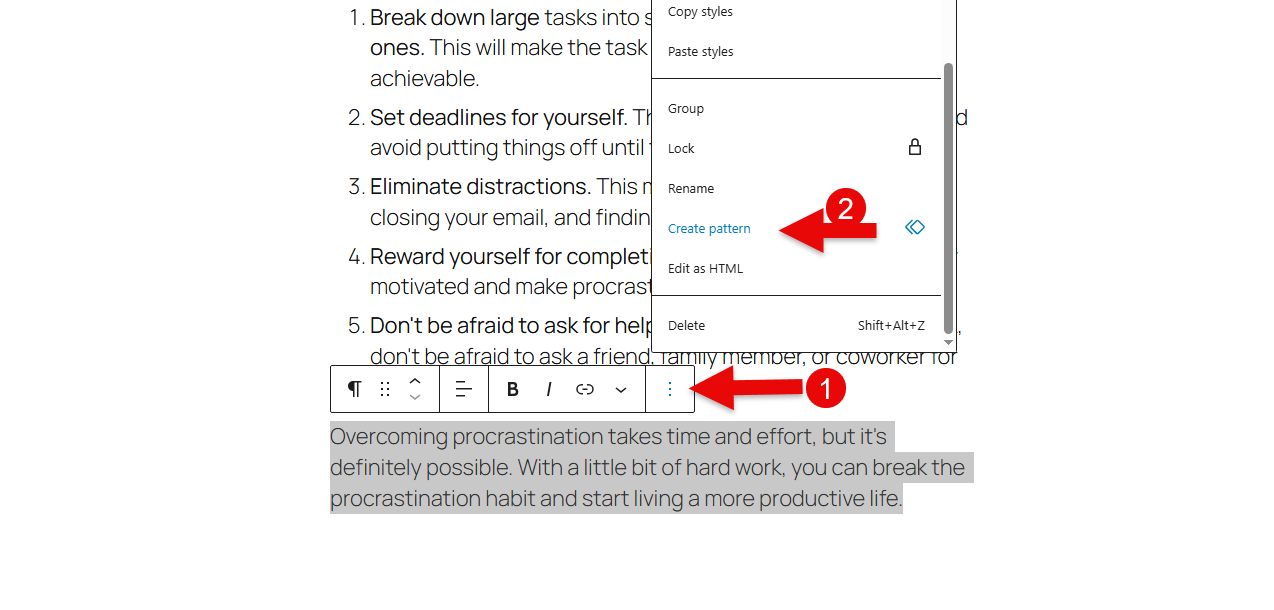
7. Reuse a Block (Create Patterns)
One of the best features of the block editor is that you can reuse a block in Page B that you have created in Page A.
And do that, you don’t have to repeat the steps over and over. Instead, what you simply need to do is access the block that you saved in the library. So, how can you create a reusable block?
For that, what you need to do is simply click on the block you want to reuse, then click the three dots, and then go to the Create pattern option.
Then you have to add details to it. Once you’re done, click Add.
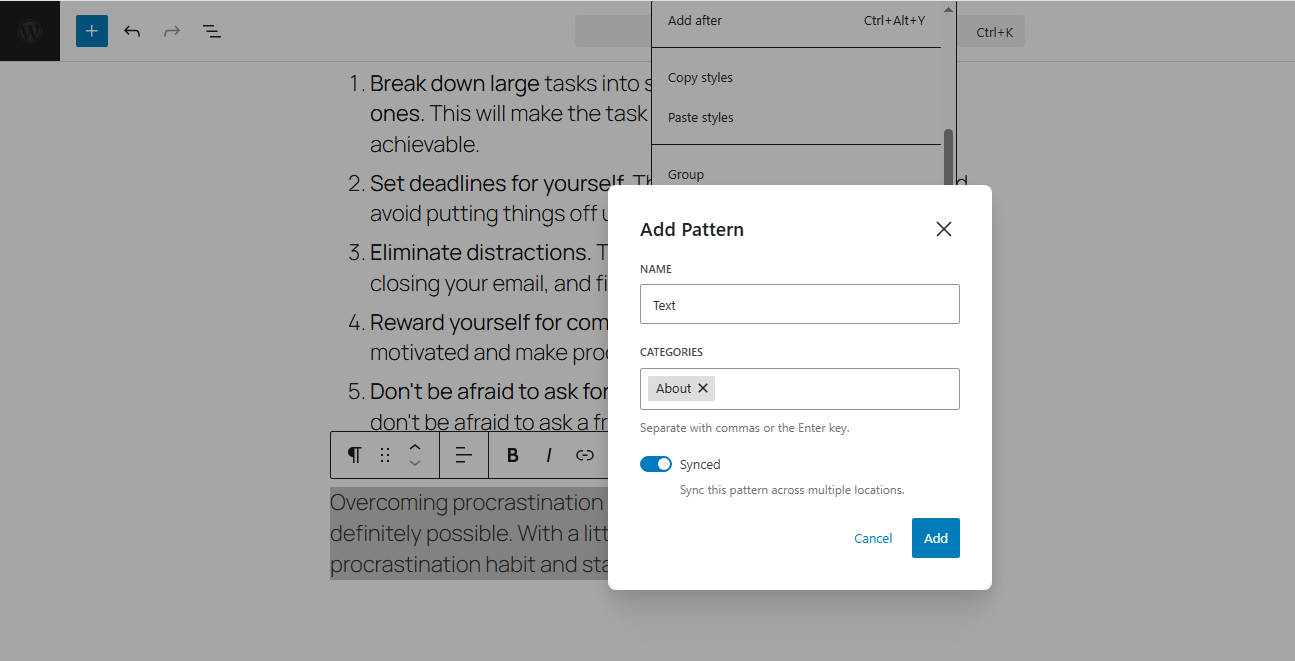
Now, the way you can use it is simple: you need to go to the block library and search for the pattern with the name you’ve assigned. Once found, click on it and use it.
8. Access Default Patterns
In order to make designing fast and efficient in WordPress, the Gutenberg editor has the default patterns available. Yes, you get pre-built patterns that you can use without any complex process, and because of these patterns, you don’t need to create some design elements from scratch.
So, to access these patterns, what you need to do is click on the ‘+’ icon in the top left corner, then you have to click on Patterns, and there you can find all the patterns that are already available in the editor.
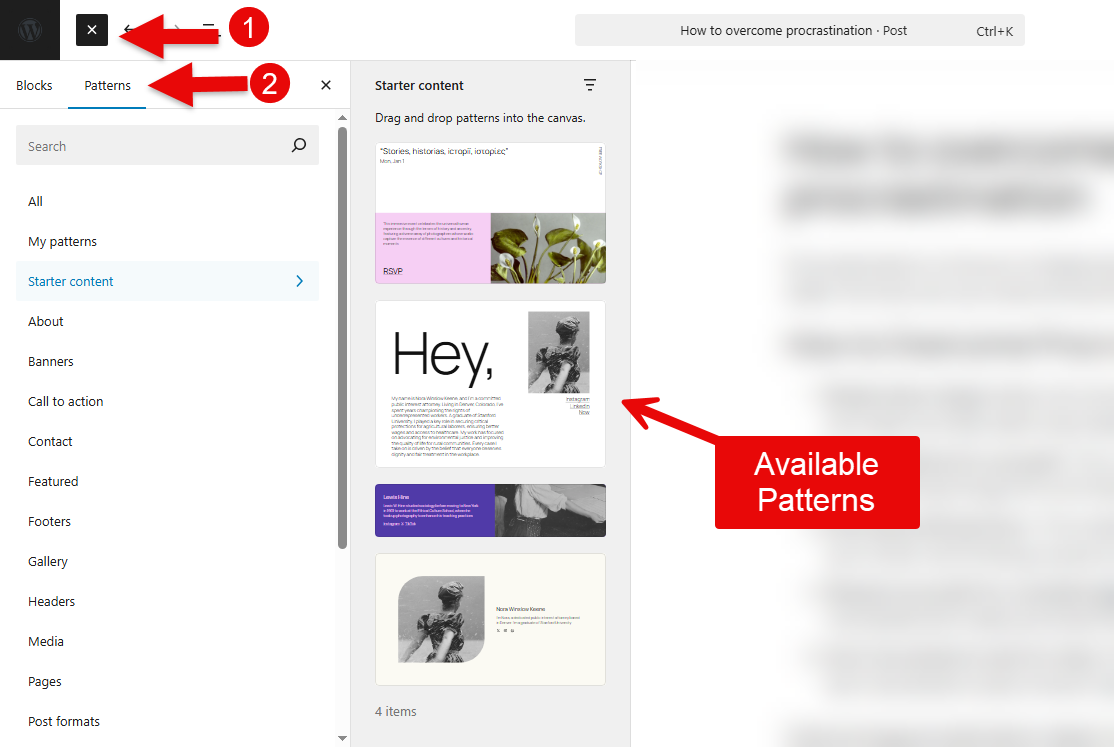
Finally, to use them, you have to place them inside the Page or Post and replace the demo content with yours. That’s it, that’s all you need to do.
9. Access the Openverse Media Library
By offering flexibility and scalability, WordPress is the best CMS on the market. On top of that, this picture has made it even better. Recently, WordPress has launched a platform where users can find royalty-free images, called Openverse.
It includes hundreds of images that you can use for free. Plus, these images are highly professional and of high quality. What’s interesting about this Openverse is that it’s also available in the WordPress block editor, enabling you to use it anytime.
Go to the plus icon, then you need to click on Media, and there you will find the Openverse option. When you click on it, you can find all the images available in the Openverse by WordPress.
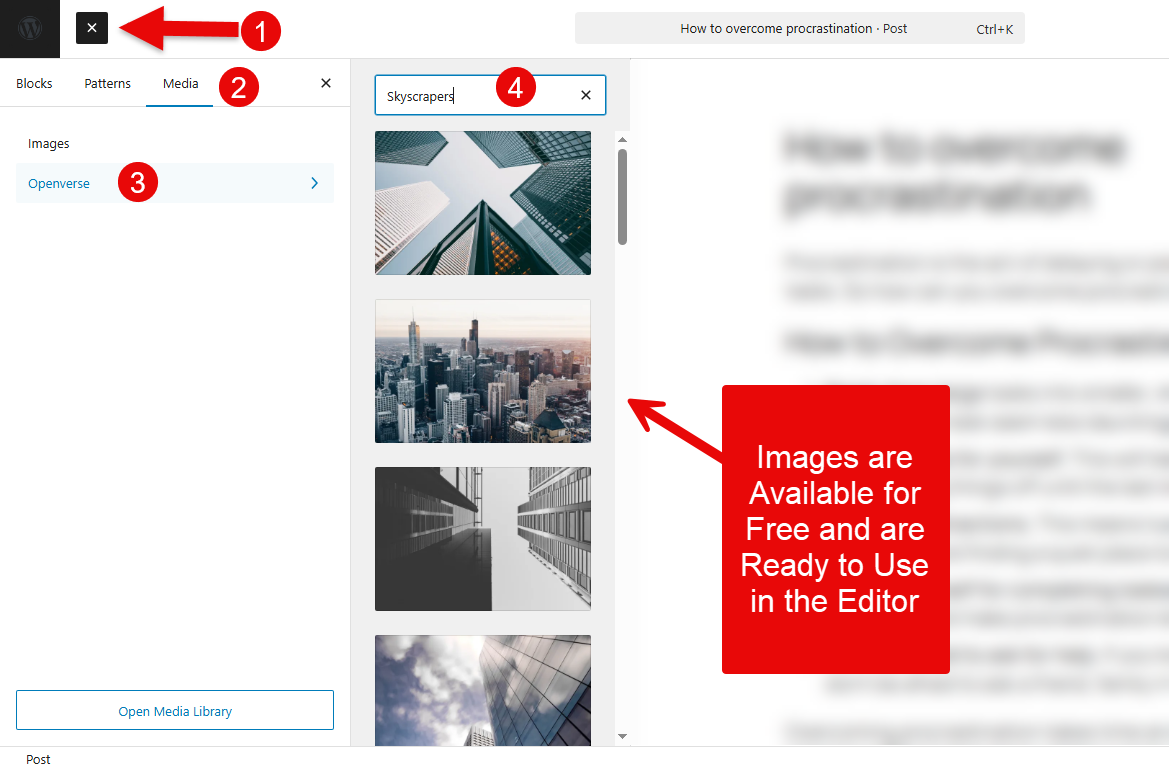
You can search for the image you want, and once you find it, simply click on it, and it will be on the page or post you are working on. It’s the best feature because you no longer need to search for images outside of your website and then upload them to your page.
Now, you simply have to access this Openverse feature, search for the image, and it will be on your page. Plus, all these images are of high quality, hence, you don’t have to compromise on quality as well.
10. Editor View Customisations for Suitable UI
While working in the Gutenberg editor, if you ever feel like that its view is not suitable to you and something different should be there, something more focused and more distraction-free, then Gutenberg has this feature that allows you to change the UI of the editor.

Go to the options that are in the top right corner, three vertical dots. When you click it, you get the View section with the following options:
- Top toolbar
- Distraction free
- Spotlight mode
- Fullscreen mode
Choose the mode you like to change the UI of the block editor, and work effectively.
11. Configure Preferences
Grouping blocks, locking a block, and changing the view of the Gutenberg editor are all good, but there’s more you can do in the Gutenberg editor. It provides you with the options to configure the preferences of how you want to use the editor in a more enhanced way.
Simply go to the options (three vertical dots) in the top-right corner, and select Preferences at the bottom.
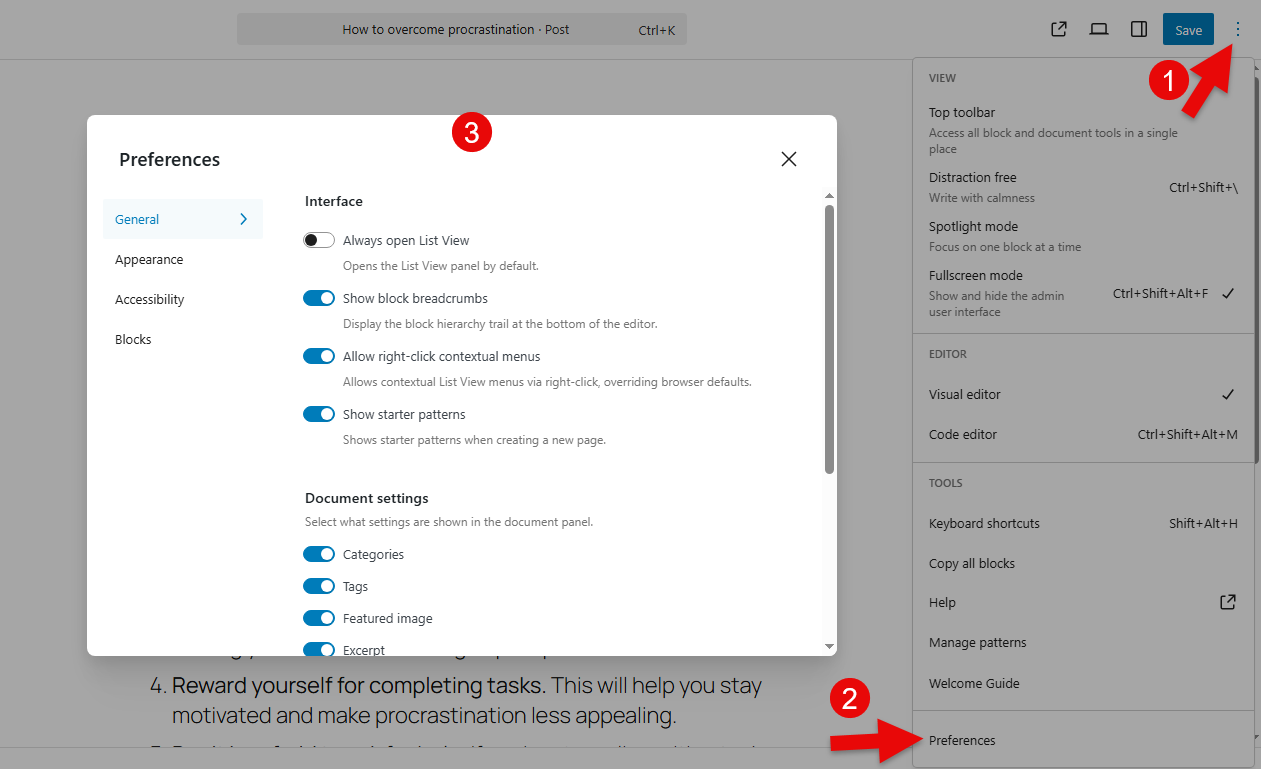
It provides you with the following options:
- General: for interface, document settings, publishing, and custom fields.
- Appearance: to change the view of the editor
- Accessibility: to add navigation and button labels
- Blocks: to enable or disable particular blocks, and show the most used blocks.
Optimize the Use of Block Editor with Additional Blocks
The native WordPress blocks are enough to build working websites, keeping the latest trends in mind. However, if you need to go even further, you need advanced blocks for the Gutenberg editor.
One such block is available in the WPMozo Blocks and Addons plugin, which stands out as one of the best Gutenberg blocks plugins for enhancing website design.

A free, yet powerful Gutenberg blocks plugin offering more than 10 advanced blocks to build various types of essential elements.
Using the WordPress blocks available with this block editor plugin, you can create elements like Before After Image Slider, Flip Box, Content Toggle, Logo Slider, and Fancy Headings. Each block offers extensive customization options, so that you can utilize them effectively.
Moreover, it receives regular updates, hence you can expect more blocks added to this plugin.
Learn more about the WPMozo Blocks and Addons plugin.
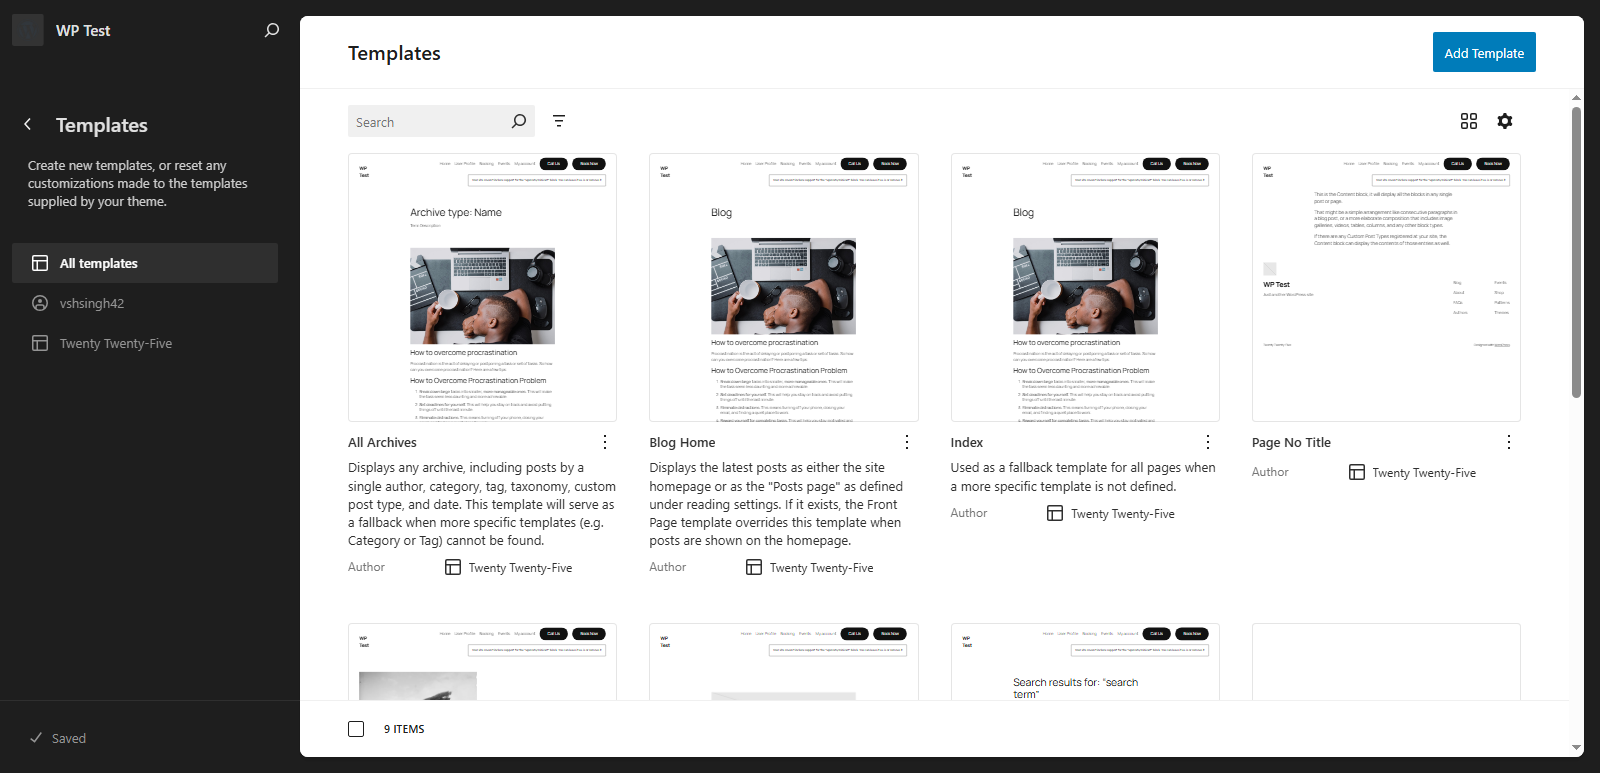
The New Role of Theme Editor: Design Patterns and Templates
When Gutenberg was launched, it only provided the functionality to add content on a page or post. It didn’t have the capabilities to create templates or global variables. WordPress users had to render post or page layouts using popular WordPress builders, such as Divi, Elementor, or Visual Composer.
However, since 2022, Gutenberg has introduced a new Editor in the Appearance tab that enables full-site editing in WordPress. This editor allows you to create templates for posts, pages, and archives.
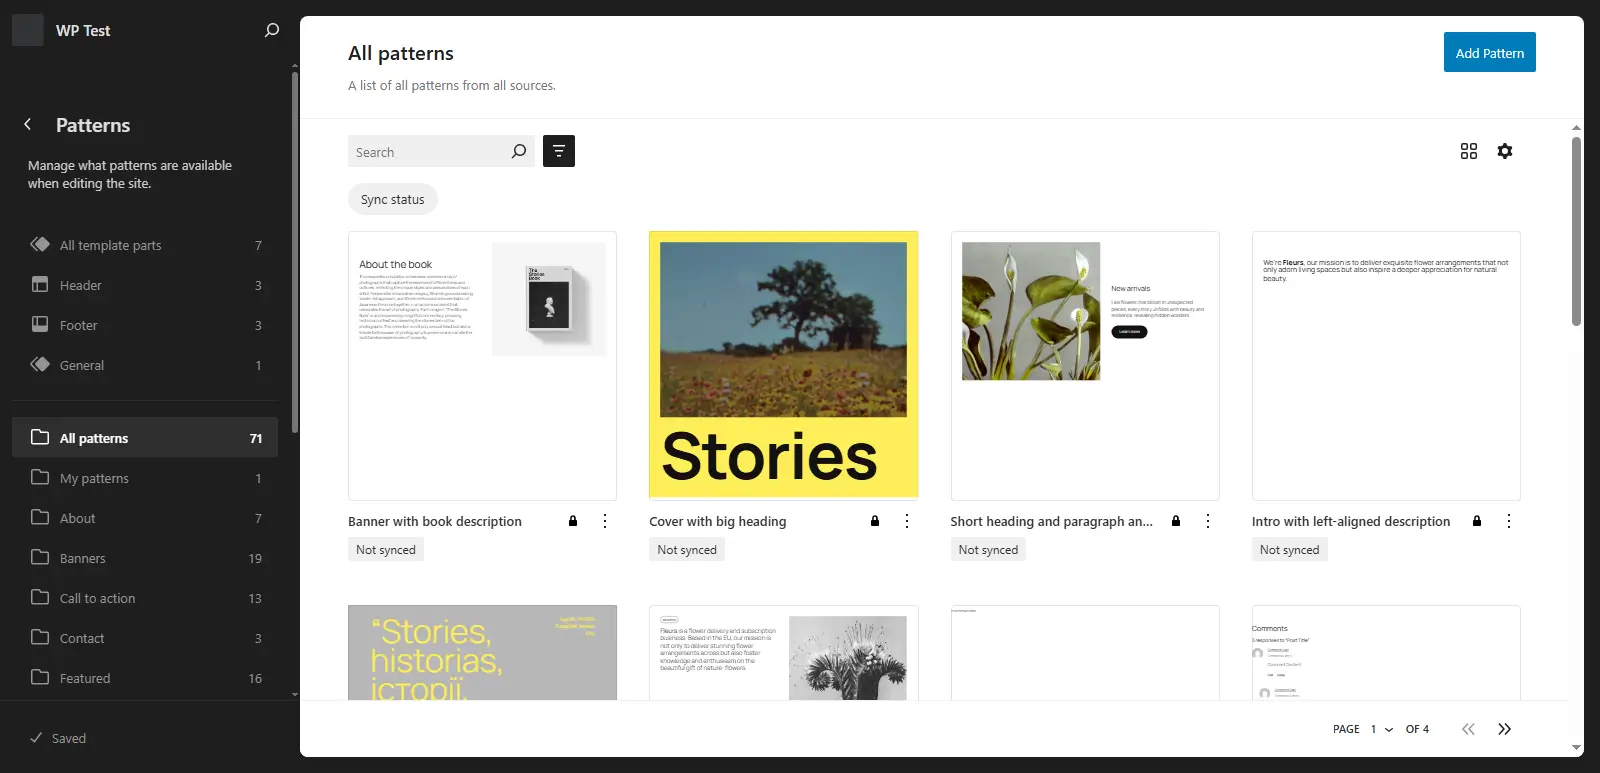
Not only this, you can create Reusable Blocks called Patterns that you can use repeatedly when you need the same design of elements across your website.
Now, you don’t have to use page builder plugins for WordPress full site editing, because Gutenberg has become a page builder itself. Now, it won’t be wrong to call a Gutenberg editor a Gutenberg Page Builder.
In addition to the patterns and templates, it provides functionalities to try different styles, offering Typography, Colors, Background, Shadows, and Layout Options.
So, you don’t have to add anything in WordPress externally and cause hindrance to the performance. All these capabilities make Gutenberg the future WordPress deserves. It’s fast, it’s flexible, and it’s intuitive, something you’d love working on.
FAQs – Frequently Asked Questions
How do I open the block editor?
To enable the Gutenberg editor for WordPress and access its features, you can create a page or post. Plus, use the Editor function of WordPress in the Appearance menu.
What is the difference between the block editor and page builder?
A page builder allows you to create web page elements using tools other than blocks, such as Elementor or Divi Builder. The WordPress Block editor functions on blocks; however, it also offers page-building functions now. Previously, it had no full site editing capabilities, but now it does.
How do I remove the block editor?
You cannot remove the WordPress block editor, but you can disable or replace it using the Classic Editor plugin (the WordPress old editor), Elementor, or other page builder options. You can also use the native method to disable Gutenberg. For that, go to Options (three dots top right corner) → Editor → select Code editor. Additionally, the Gutenberg editor offers a Classic Block for text-based visual editing.
Final Thoughts
The whole section of this post covered different aspects of the new WordPress editor: Gutenberg or the Block Editor. What it is, how you can utilize it, and what capabilities it provides for full site editing in WordPress.
Additionally, we looked at the advanced blocks plugin, WPMozo Blocks and Addons.
With Gutenberg, it’s now possible to create extensive websites. And with the help of additional block plugins, you can improve the way it does. The future is clear, Gutenberg editor will make designing websites easy in WordPress, which was already possible before, but now, even better.
You don’t have to learn a lot when it comes to the Gutenberg Block editor, and that’s the most impressive thing about it.
If you haven’t tried it yet, then don’t wait any longer. Give it your best shot right away, you’ll be amazed by it. And to enhance its capabilities, get the free blocks plugin, WPMozo Blocks and Addons.


0 Comments