
Website migration with one-click migration tools and better plugins is much easier nowadays as compared to before. However, even with the ease of migration, anything can go wrong if not planned well. There are various reasons for wanting to switch to a new host, such as slow page loading times, rising renewal costs, unreliable customer support, or just wanting to consolidate several client websites under one provider.
The process of moving your website is more than just copying files from one server to the other. If you want to know how to migrate a WordPress website without losing data, experiencing downtime, or damaging your search engine rankings, proper preparation is key.
In this guide, you will learn more about how to move a WordPress site to a new host safely in 2026. You will migrate your WordPress site confidently while keeping visitors and search engines happy.
Before You Migrate: 7-Point Preparation Checklist
Preparation for website migration takes longer than the transfer itself. Use this valuable WordPress migration checklist before moving your website:
1. Create a Complete Backup (Files and Database)
Before undertaking any website migration, have a full backup stored somewhere outside your hosting account. The backup should have: WordPress files, themes, plugins, uploads, database, wp-config.php, and custom configuration files.
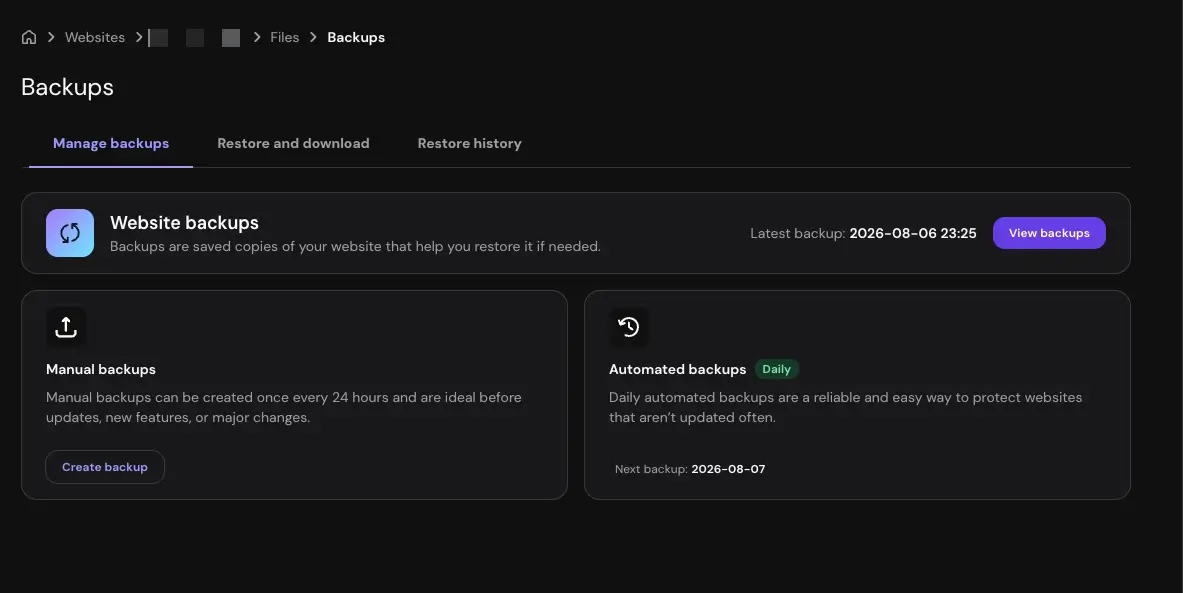
Some good backup options include: your hosting provider's backup tool, Duplicator, UpdraftPlus, and Manual SFTP download combined with a database export. You can then store your backup on cloud storage and another local secure location.
2. Check Server Compatibility
Before purchasing new hosting, compare the server environments. For instance, at the time of writing, WordPress recommends: PHP 8.3 or newer, MySQL 8.0 or newer or MariaDB 10.11 or newer, HTTPS support, and Apache or Nginx web server.
Even though WordPress can operate on older PHP versions, running outdated software may reduce performance, compatibility, and security.
Other vital things to check include: WordPress 7.0 requirements, PHP memory limit, maximum upload size, execution time, disk storage, CPU allocation, Redis or object caching availability, and OPcache support.
3. Audit Your Plugins and Themes
Migrating unnecessary files only increases migration time and creates more opportunities for errors. Therefore, before migrating your website to another host: delete inactive plugins, remove unused themes, update active plugins, update WordPress core, update your active theme, and remove temporary maintenance plugins you no longer use.
4. Document Server-Level Settings
Many website owners assume everything moves automatically. Well, it doesn't. Several important settings exist outside WordPress itself. These include: custom .htaccess rules, Nginx configuration, PHP.ini overrides, redirect rules, security rules, Cron jobs, SMTP configuration, Firewall allowlists, Image optimization services, and CDN configuration.
5. Record Your Current DNS Records
One of the easiest mistakes you can make during a migration is accidentally disrupting email. Therefore, before changing anything, record your current DNS records. The relevant information includes A records, AAAA records (if used), CNAME records, MX records, TXT records, SPF records, DKIM records, and DMARC records.
If your email is hosted separately (such as Microsoft 365 or Google Workspace), preserving these records ensures your email continues working after the migration.
6. Lower DNS TTL Before Migration
DNS propagation cannot be eliminated, but it can be shortened. Reduce your DNS TTL (Time To Live) to 300 seconds approximately a day or two before migrating.
This move encourages internet providers to refresh DNS information more frequently to help visitors reach the new server soon after the migration occurs. Once done, restore the normal TTL.
7. Choose the Right Migration Window
Avoid migrating during major sales, marketing campaigns, product launches, peak traffic hours, or newsletter sends. Try to choose a low-traffic period. Remember to notify team members, inform clients if necessary, and schedule maintenance mode if appropriate.
If running an online store, membership websites, booking platforms, or any site that receives frequent user-generated content, schedule a temporary content freeze. This prevents new orders, comments, or registrations from being added to the old server while DNS changes are propagating.
3 Ways to Transfer a WordPress Site to a New Host
There isn't a single best method for how to transfer a WordPress site to a new host. It all depends on the website's size, technical experience, and whether your hosting provider offers migration assistance.
Method 1: Let Your New Hosting Provider Migrate It
For many website owners, this is the easiest option. Most major hosts (e.g., WP Engine, Kinsey, SiteGround) include one free migration when you become a customer. A typical migration process looks like this:
- Purchase your new hosting plan
- Submit a migration request
- Provide temporary access credentials (typically WordPress admin, SFTP, or cPanel)
- The hosting provider copies your website to the new server
- They create a temporary preview or staging URL
- You test everything thoroughly
- Once approved, you update your DNS records to point to the new host
Because experienced migration technicians perform these transfers daily, they can often identify issues before they become problems. Even if your host handles everything, don't assume every detail is correct.
Before changing your DNS, test the homepage, internal pages, contact forms, images, menus, user login, search functionality, WooCommerce checkout, payment gateways, SSL certificate, email delivery, custom redirects, and mobile responsiveness.
Your hosting provider's responsibility usually ends once the files are copied successfully. Functional testing is still your responsibility.
Method 2: Use a WordPress Migration Plugin
The other option is to migrate the WordPress website yourself without manually copying the database and files. Therefore, you use a migration plugin. Widely used WordPress migration plugins include Duplicator, All in One WP Migration, Migrate Guru, and Updraft Plus (migration feature).
The plugins function differently during migration, but they all aim to automate the most time-consuming parts. Therefore, you need to review their functionalities to see whether it supports your website’s size and the needs at hand.
Migrating With Duplicator
Duplicator has over 1 million active installations and a 4.9-star rating on WordPress.org, and it packages your website into a portable archive.
Step 1: Install Duplicator Plugin
Access your WordPress website, click on Plugins > Add new plugin > search for Duplicator.
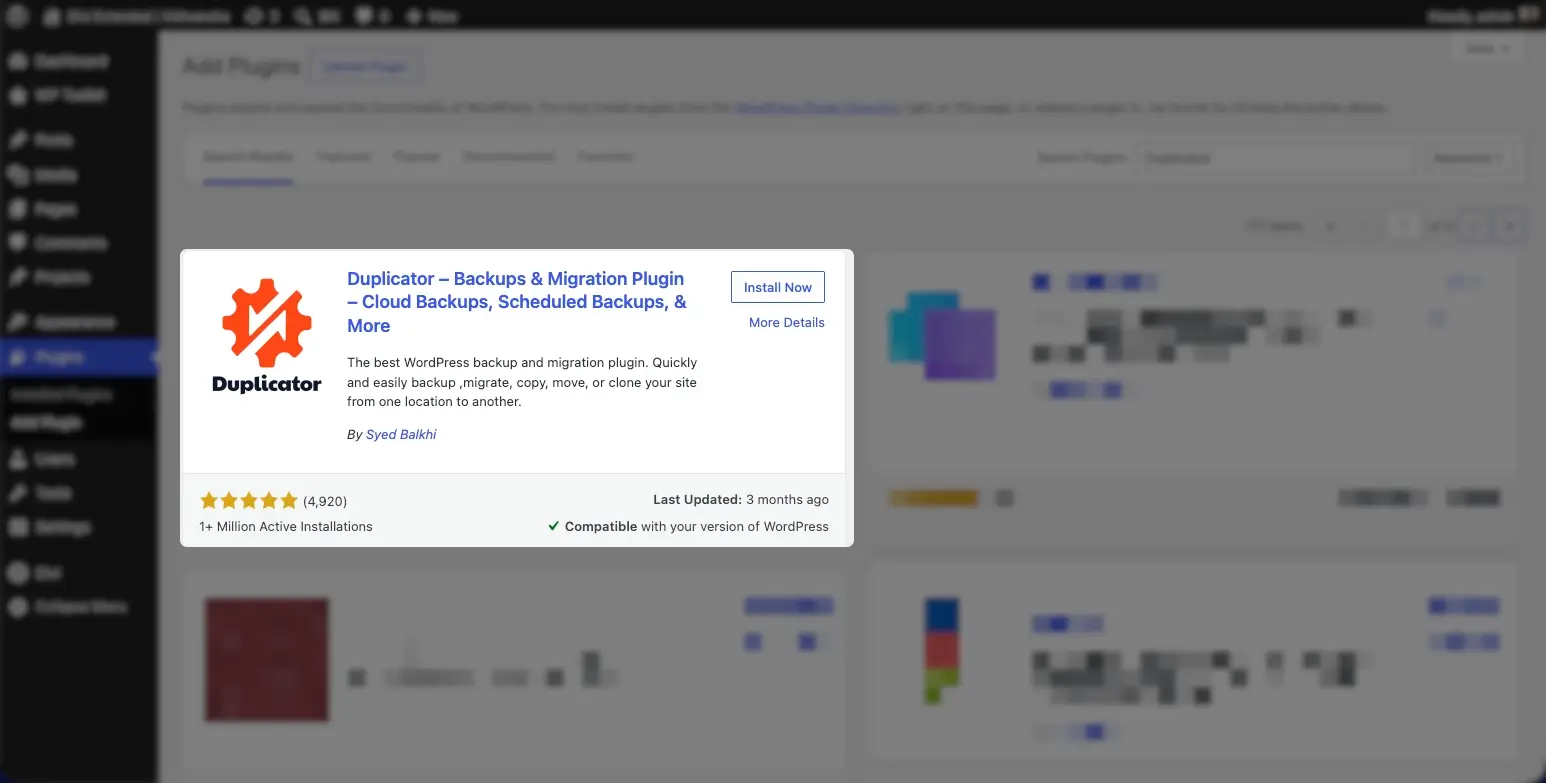
Install and activate it.
Step 2: Build the Package
Once installed, a setup wizard will appear; you can opt in to the marketing campaigns or skip. On the redirect, click on “create new” to create a new backup.
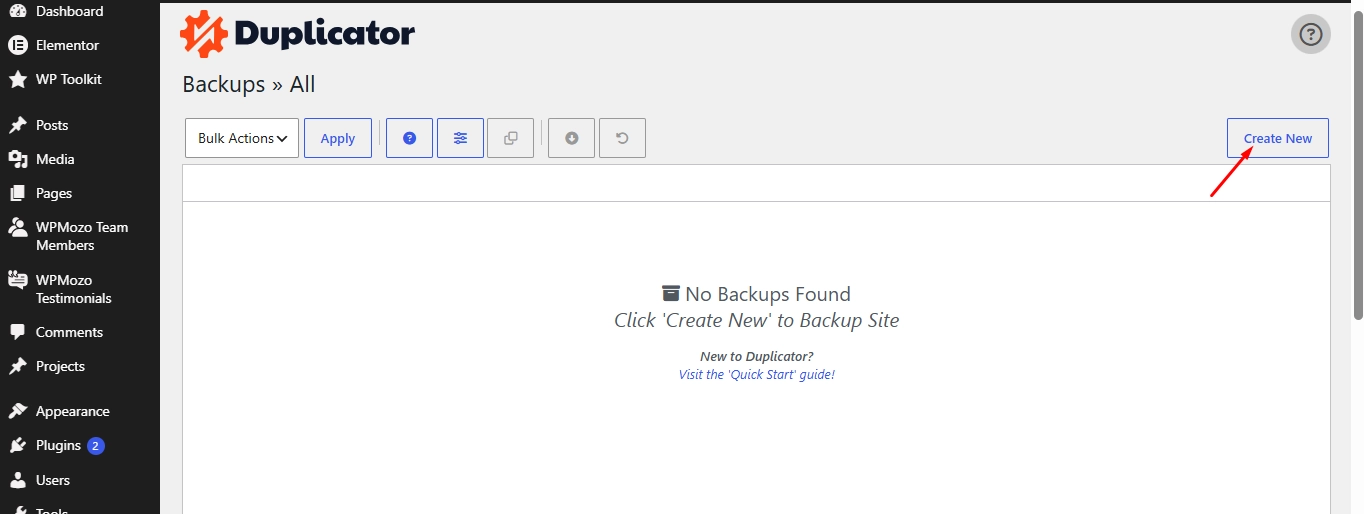
Choose or write a name for the recent backup and storage point, then click Next.
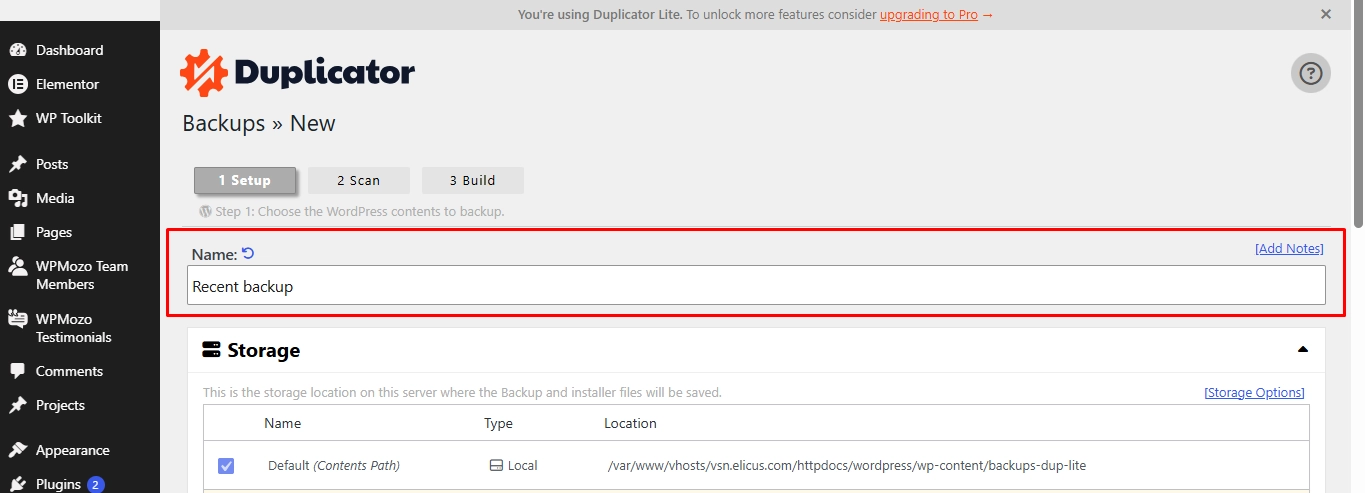
Step 3: Scan of the Website
Wait for the Duplicator plugin to scan your website, and it will provide an output of the results.
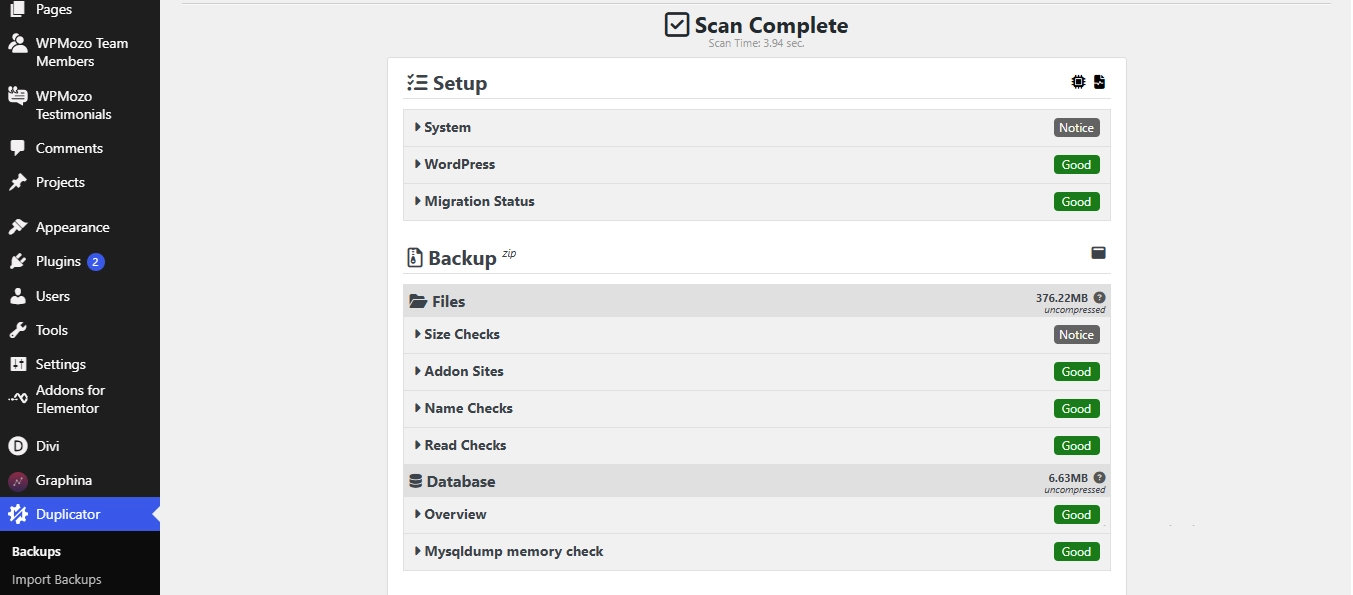
Step 4: Backup Built
Wait for the plugin to back up the site. The amount of time depends on the size of your website.
Once complete, you can choose to download the installer, archive, or both. The compressed archive contains your website files and database. The other is an installer PHP file. Be sure to download both.
Step 5: Upload to Your New Host
Now that you have a backup, you can use SFTP or your hosting file manager to upload both files to the new server’s web root. (We are using Namecheap for illustration) Most hosting providers' dashboards are almost the same, so the procedure is the same
i) Log in to your cPanel, e.g., yourdomain.com/cpanel. You will be redirected to the cPanel tools dashboard
ii) Create a new domain
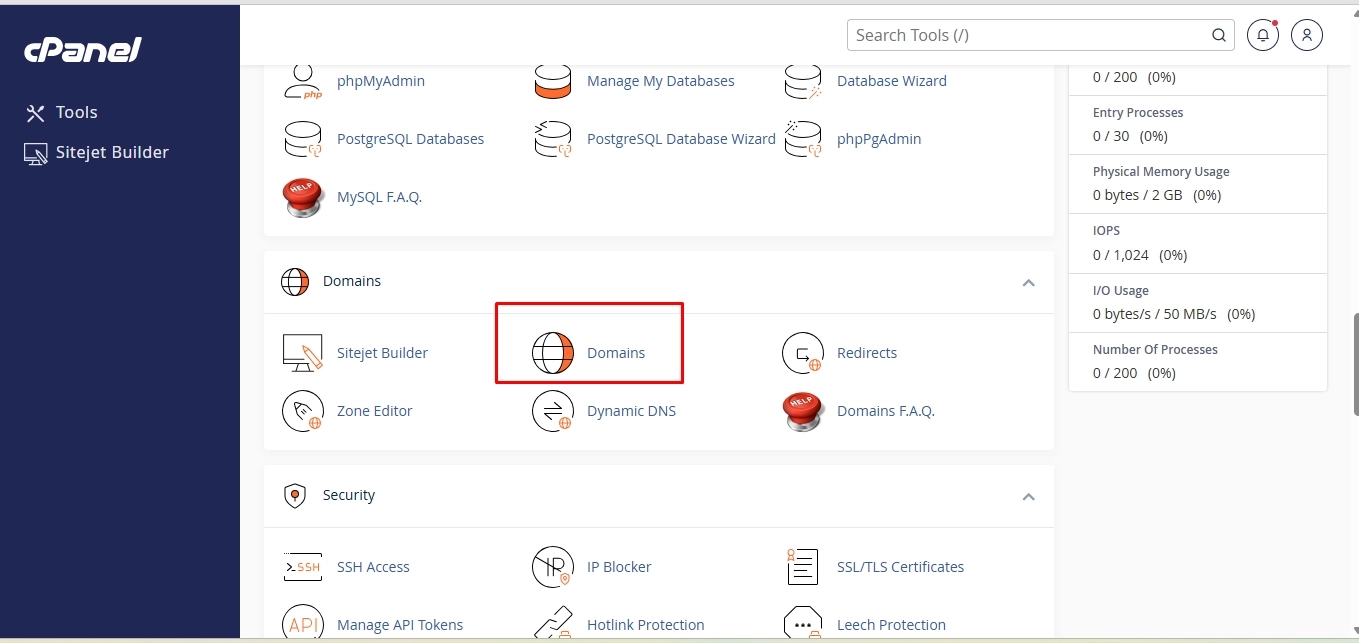
Create the domain where your website files will be stored.
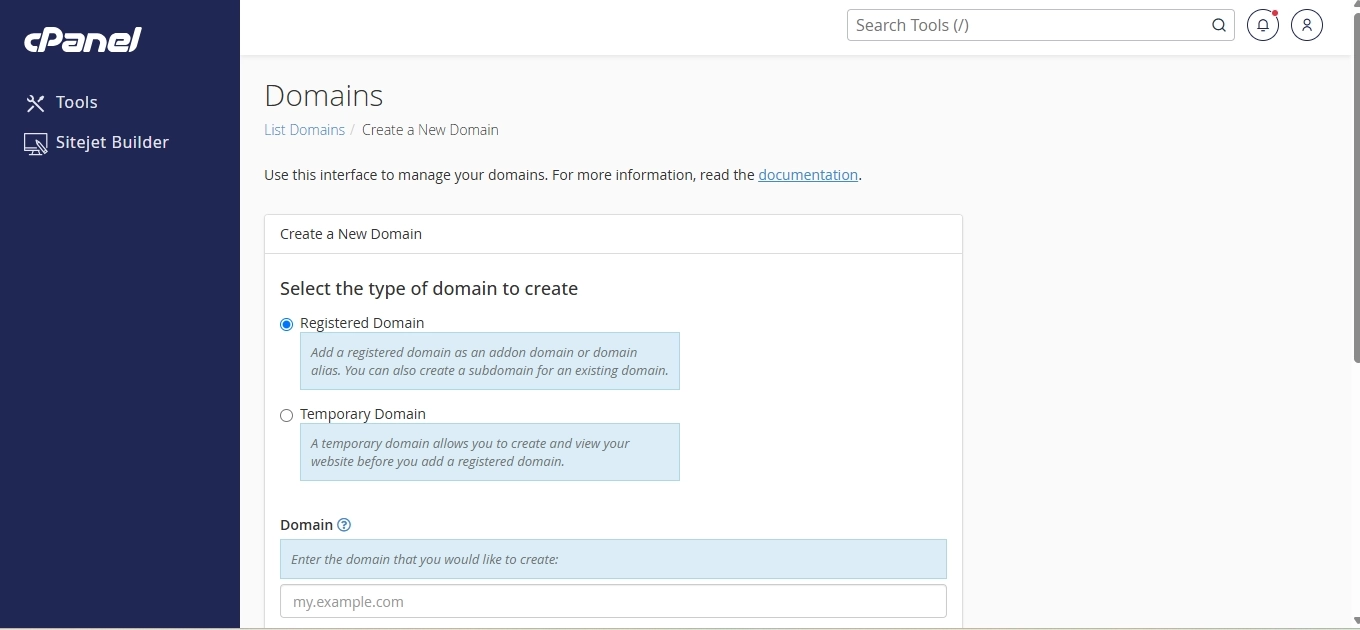
iii) Create the database
With the domain in place, you can now create the database comfortably. Therefore, click on the Manage My Database option.
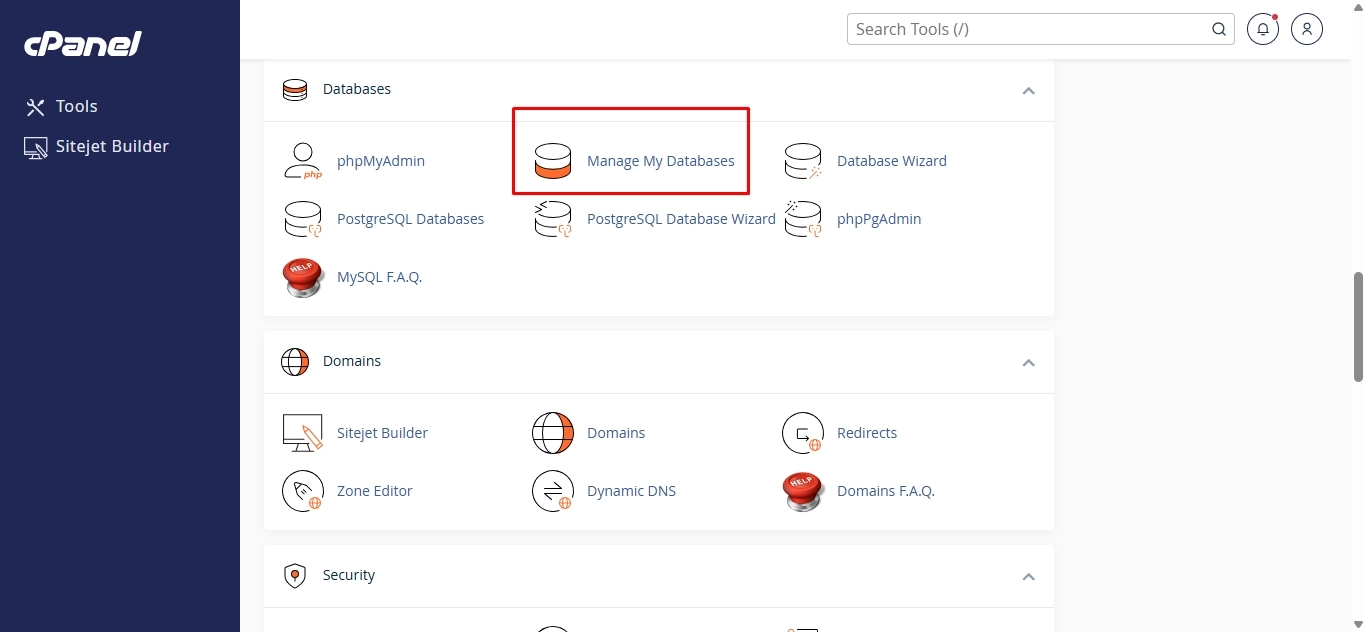
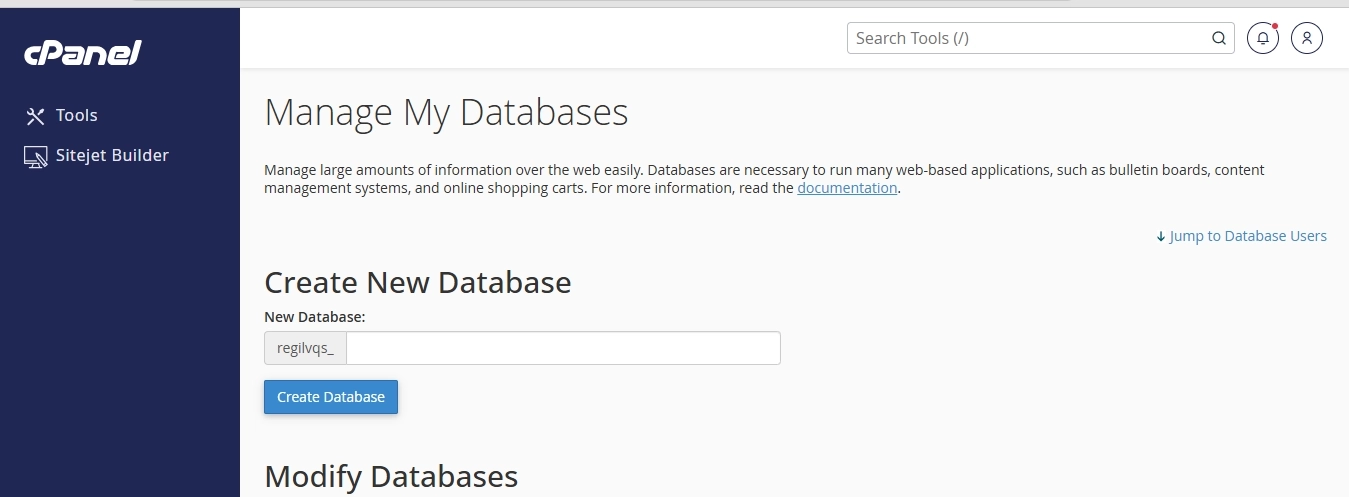
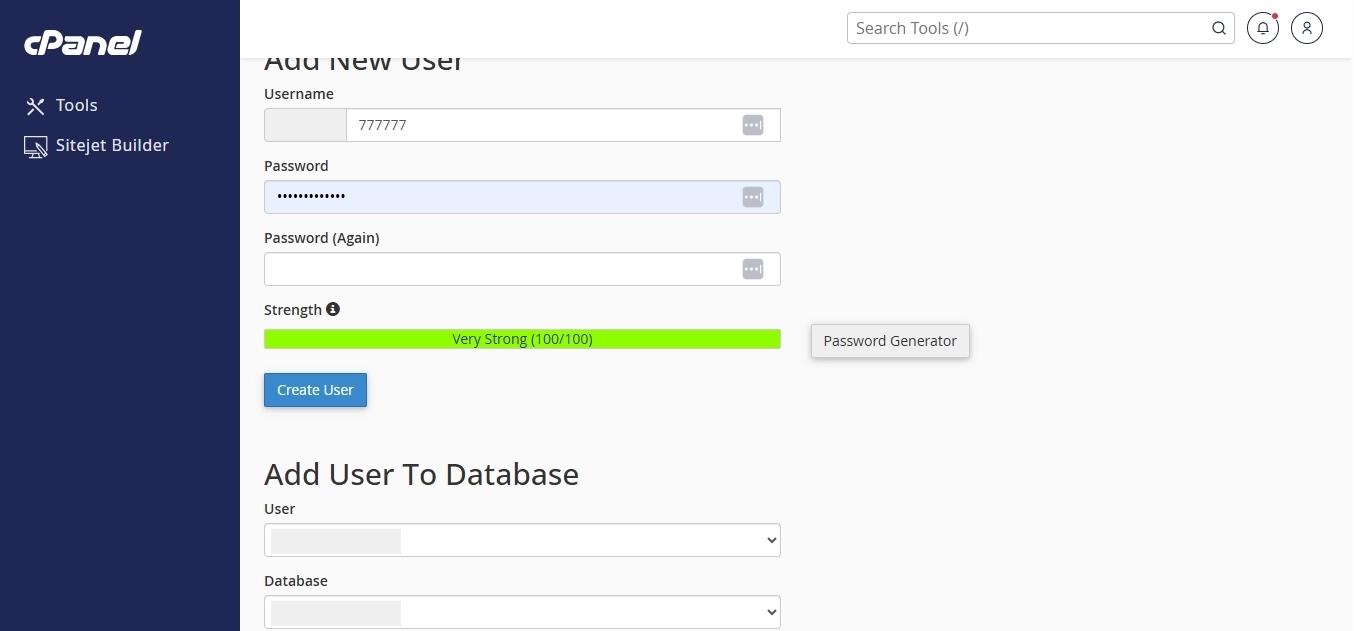
This is where you will create your MySQL database, create a database user, assign the user full privileges, and record the database name, username, and password. Keep this information safe.
Add the user to the database.
Step 6: Run the Installer
With the database and domain in place, you can now run the installer. Ensure you upload the installer.php to your file manager > specific site folder.
Now, open
yourdomain.com/installer.php
The installer will extract your archive, connect to the new database, import your data, update configuration files, replace old URLs where necessary, and complete the migration automatically.
Step 7: Verify That Everything Works
Once the installer finishes, log in to your WordPress dashboard and check whether the images display correctly, the plugins work, themes load properly, admin access functions normally, and the front-end pages render without errors.
Sidenote: Migration plugins are convenient; however, not the right fit for every website. You can encounter issues if you have large media libraries, databases containing millions of records, limited PHP execution time, restricted hosting environments, complex multisite installations, custom server configurations, and serialized data edge cases that require additional attention. In these situations, a manual migration often provides greater reliability and control.
Method 3: Manual Migration (SFTP + Database Export)
For larger websites or more complex hosting environments, a manual WordPress migration offers the greatest level of control. While it requires more technical knowledge than using a migration plugin, it's often the preferred approach for developers, agencies, and businesses with mission-critical websites.
Manual migrations are particularly useful when the website is several gigabytes in size, migration plugins time out or fail, you're moving between different server stacks (for example, Apache to Nginx), or you want complete visibility into every step of the migration. You are managing multiple websites or custom server configurations.
Step 1: Export the Database
Your WordPress database stores posts, pages, users, settings, comments, and other dynamic content.
i) You can export it using either phpMyAdmin (available in most hosting control panels) or WP-CLI using:
```bash

wp db export

```
This generates an SQL backup that you'll import into the new server later.
ii) For PHPmyAdmin, access your cPanel, click on PHPmyAdmin. You will be redirected.
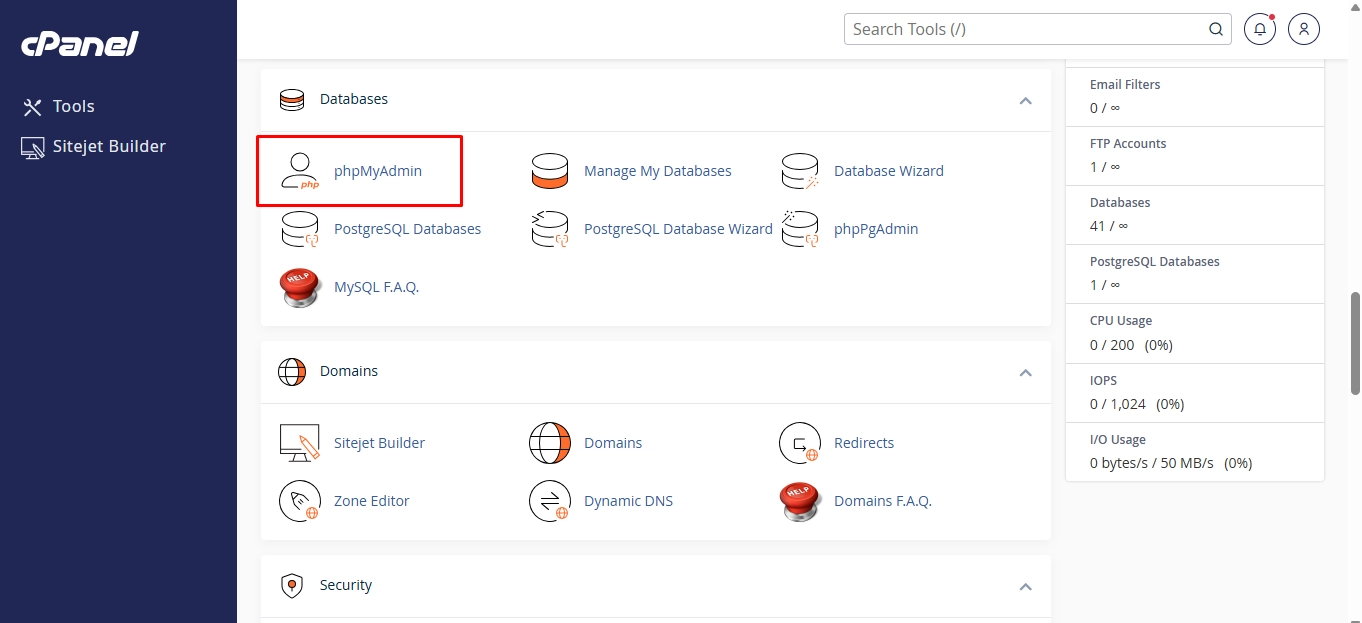
iii) Select your database name, then on the top menu, click on Export Database
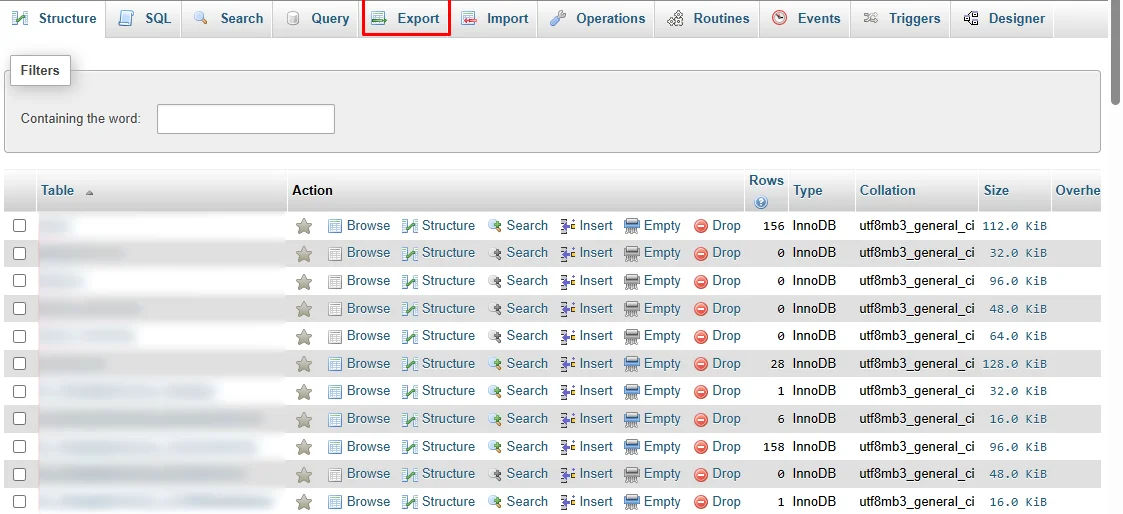
iii) Now you can export the database.
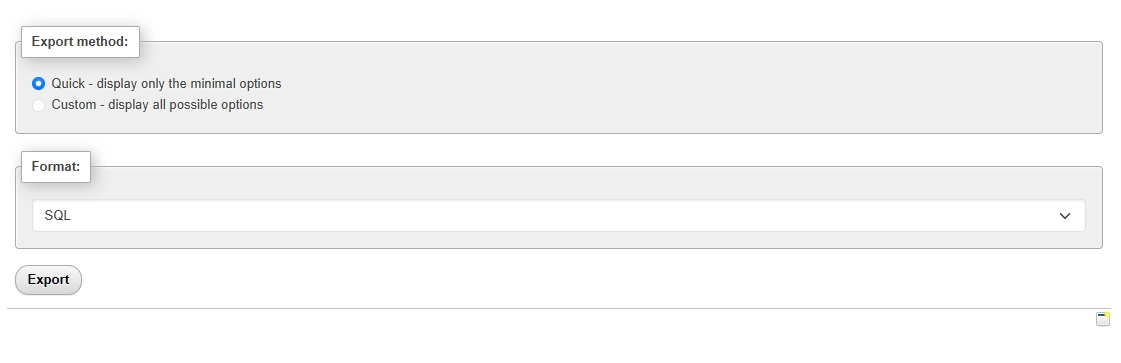
Step 2: Download Your Website Files
Using an SFTP client such as FileZilla or Cyberduck, download your website files. Many developers copy only the wp-content directory because WordPress core files can be replaced with a fresh install with a fresh installation. However, if you have custom configurations or aren't sure which files have been modified, downloading the entire website root is the safer option.
Don't forget hidden files like htaccess, robots.txt, wp-config.php
Therefore, access cpanel > file manager > specific website > Select all files > compress
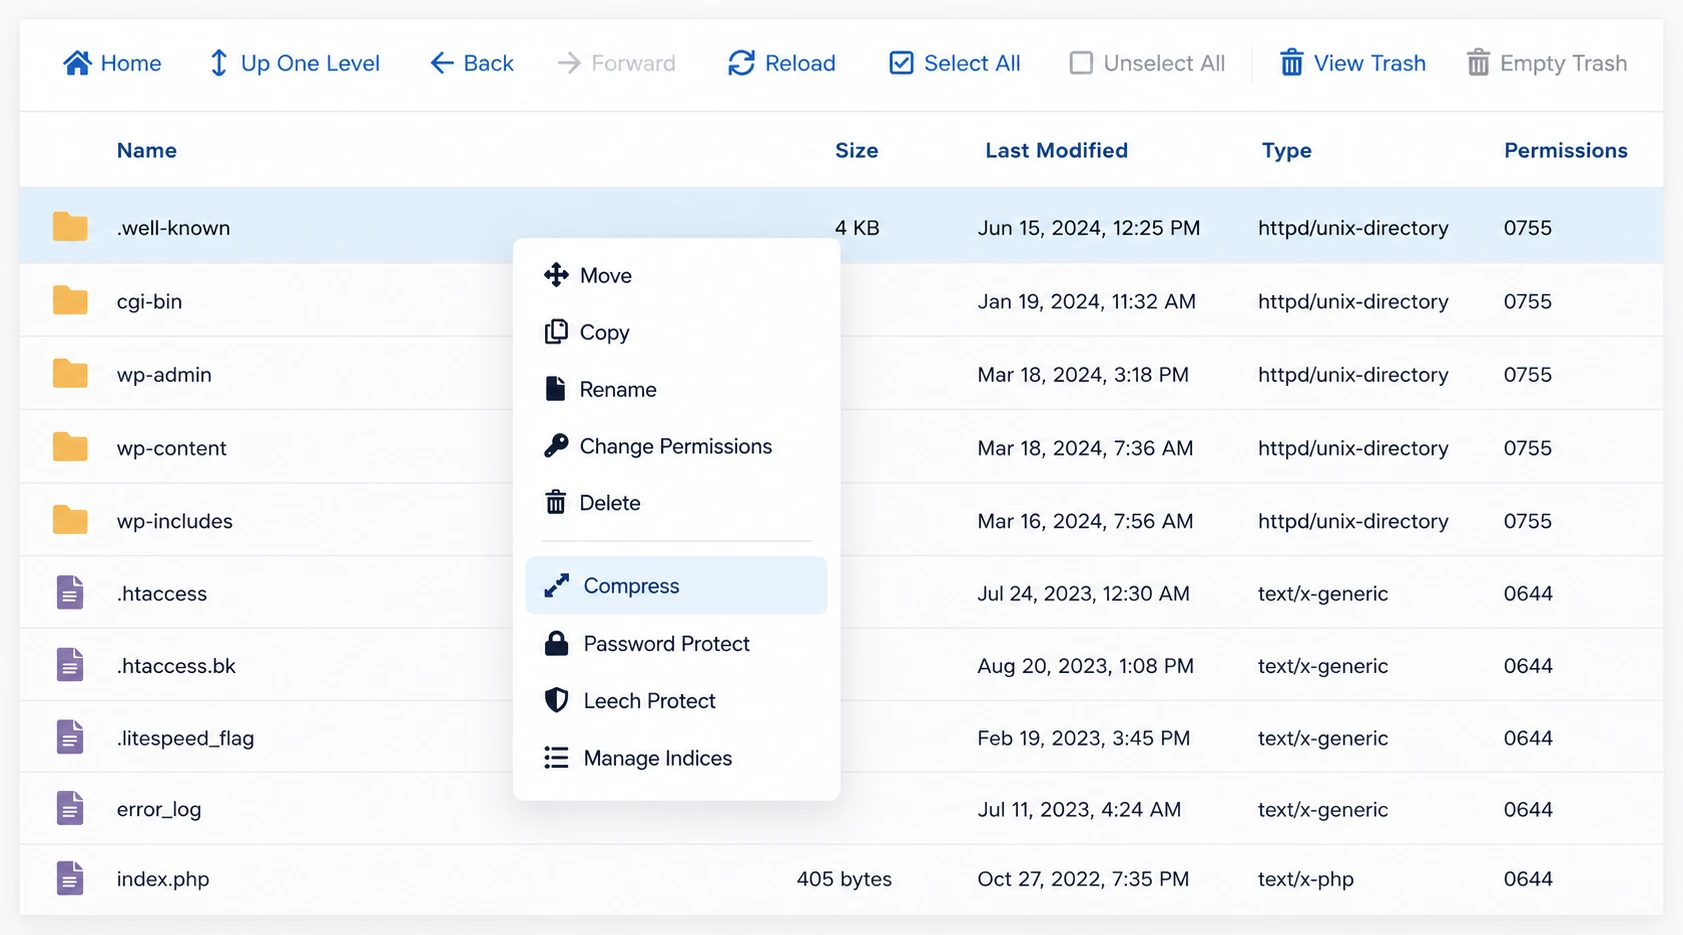
The files will be saved in a compressed file that you can download and import to your new hosting.
Step 3: Create a Domain in Your New Host
Proceed to click on cPanel > Domains and create the domain you will use in your new hosting package.
Step 4: Create a Database on the New Host
Now proceed to click cPanel > Manage My Databases and create a new database. First, create a new database, then create a database user, and assign the user full privileges. Record the Database name, Username, Password, and database host (often `localhost`, but not always)
Step 5: Upload Your Files
Upload the website files to the new server using SFTP. Depending on your site's size and internet speed, this can take anywhere from a few minutes to several hours. Alternatively, access cPanel> File Manager > your domain name > extract the WordPress files there.
Step 6: Import the Database
Using phpMyAdmin (or the command line), import your SQL backup into the newly created database.
i) Click on phpMyAdmin
ii) Choose the specific database you’ve created.
iii) Click on the import option to import the database you had earlier exported.
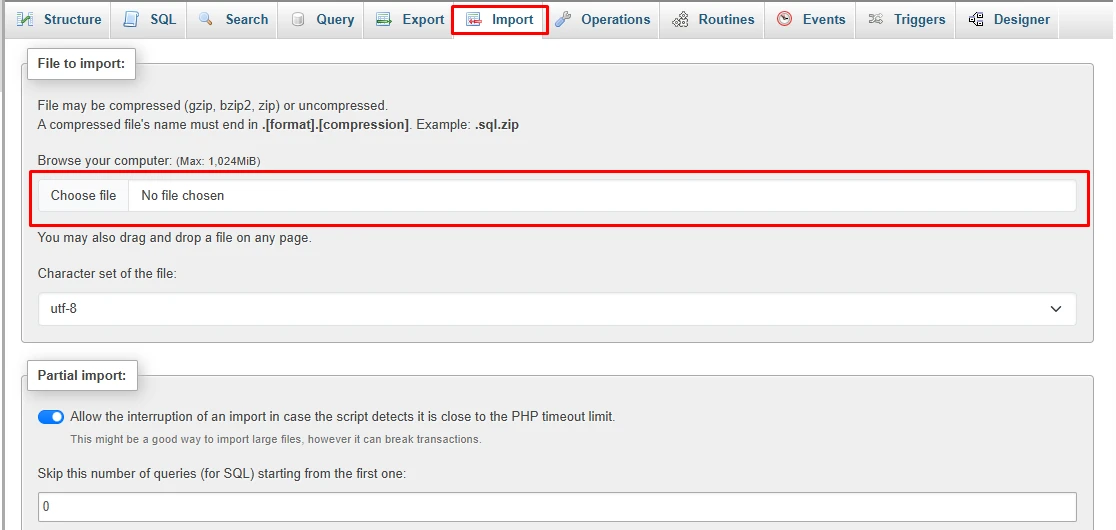
The database will be imported. Once imported, all your WordPress content and settings should now exist on the new server.
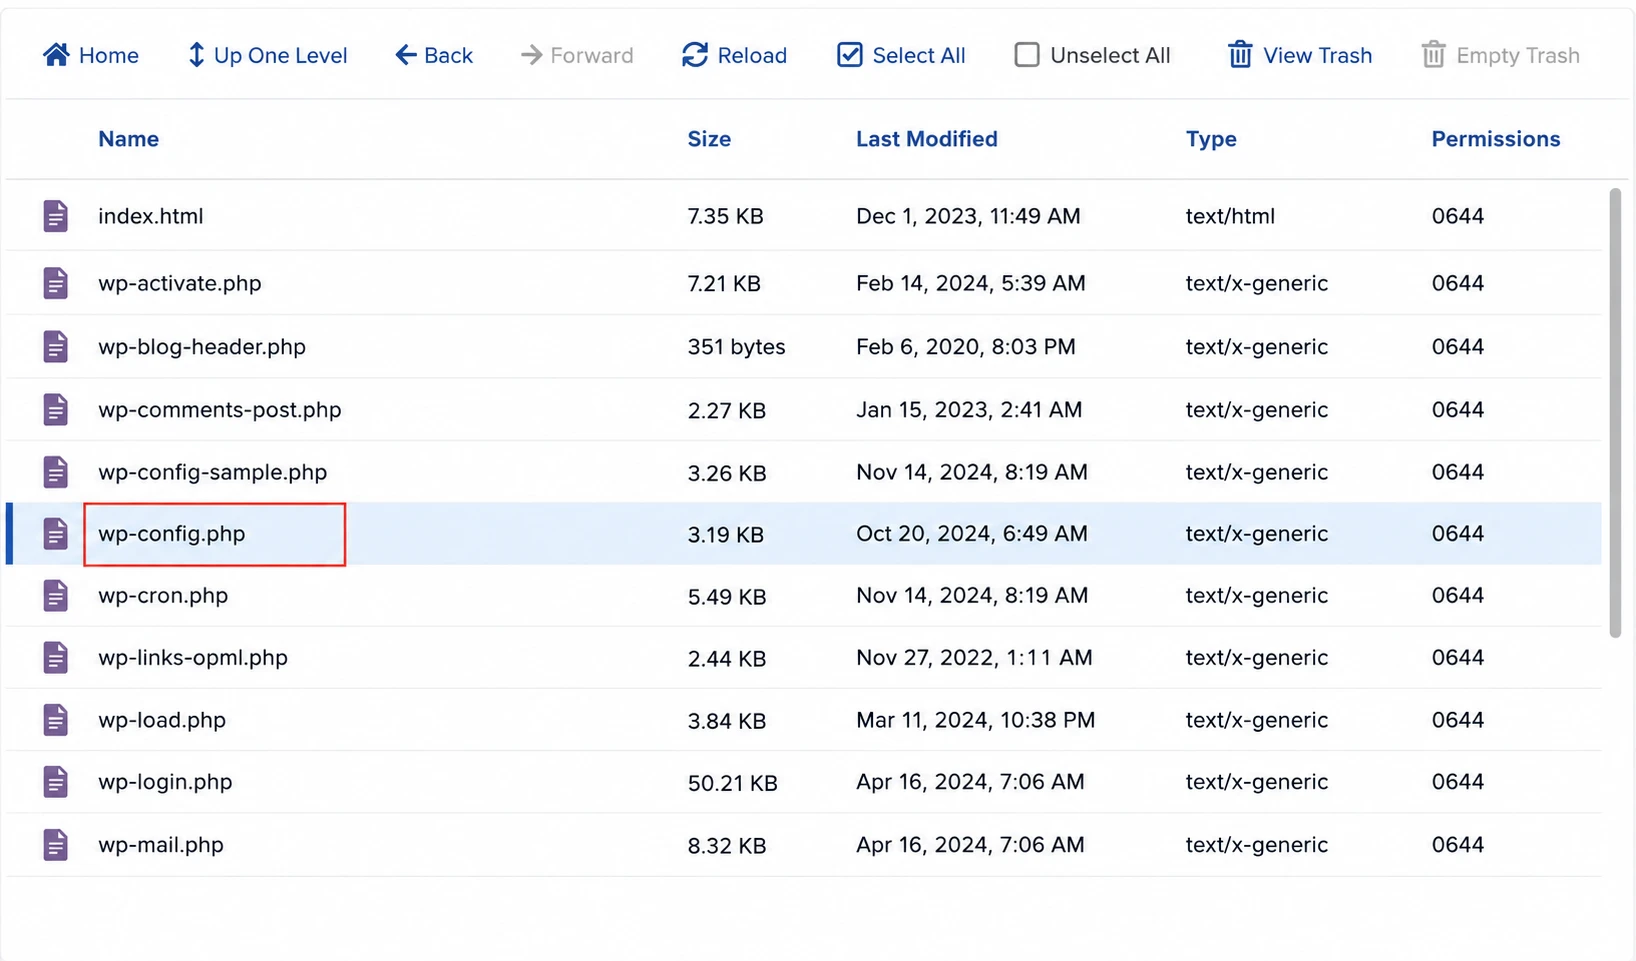
Step 7: Update wp-config.php
Go back to the file manager > Your site files > Edit your wp-config.php file with the new database credentials: database name, username, password, and Host. Without updating these values, WordPress won't be able to connect to the database.
Step 8: Run a Proper Search and Replace
If your migration involves a new domain, a staging URL, or switching from HTTP to HTTPS, you'll need to update URLs throughout the database.
This is where many migrations go wrong. Never perform a raw SQL find and replace on a WordPress database. WordPress stores many values as serialized data, and a basic SQL replacement can corrupt those records. Instead, use tools that understand WordPress serialization.
Switching DNS Without Downtime
One of the biggest concerns during a migration is website downtime. Fortunately, a host-only move can often be completed with little or no noticeable interruption if you handle the DNS transition carefully.
1. Test the New Server First
Before changing any DNS records, verify that the migrated website works correctly on the new server.
Most hosting providers offer one of two testing options: a temporary staging URL or a preview URL using your account hostname. Developers often prefer editing their local hosts file, allowing them to preview the new server while the rest of the world continues seeing the old one. This lets you test everything without affecting visitors.
Therefore, check navigation, images, forms, search, login, admin dashboard, and Checkout (if applicable). Never point your domain to the new host until these checks pass.
2. Keep Both Servers Running
When DNS changes begin propagating, visitors won't all reach the new server immediately. Some internet providers update within minutes; others may take several hours. During this time, some users visit the old server, and others reach the new server.
If visitors continue creating content on the old servers, such as placing WooCommerce orders, submitting forms, or publishing posts, those changes won't automatically appear on the new server.
That's why scheduling a content freeze before switching DNS is so important for dynamic websites.
3. Update Your DNS Records
Once you're satisfied with testing, update either your A record, pointing it to the new server's IP address, or your nameservers, if the new host manages your DNS.
After making the change, monitor propagation using a DNS propagation checker to confirm that your new records are appearing worldwide. Once propagation is complete and you're confident the migration succeeded, restore your DNS TTL to its previous value.
Post-Migration Checklist
Even after your website is live on the new host, your work isn't finished. Use this checklist to verify everything is functioning as expected.
1. Re-save Permalinks
You will need to access your WordPress dashboard, navigate to Settings, then Permalinks. Without changing anything, just click Save Changes.
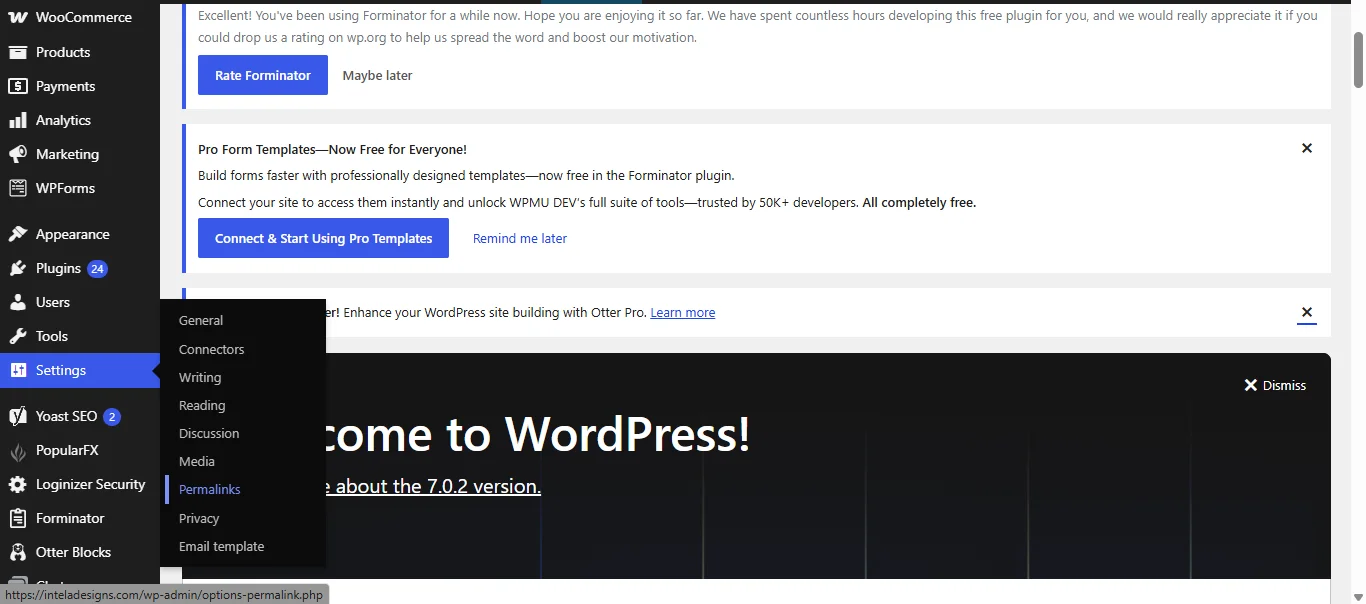
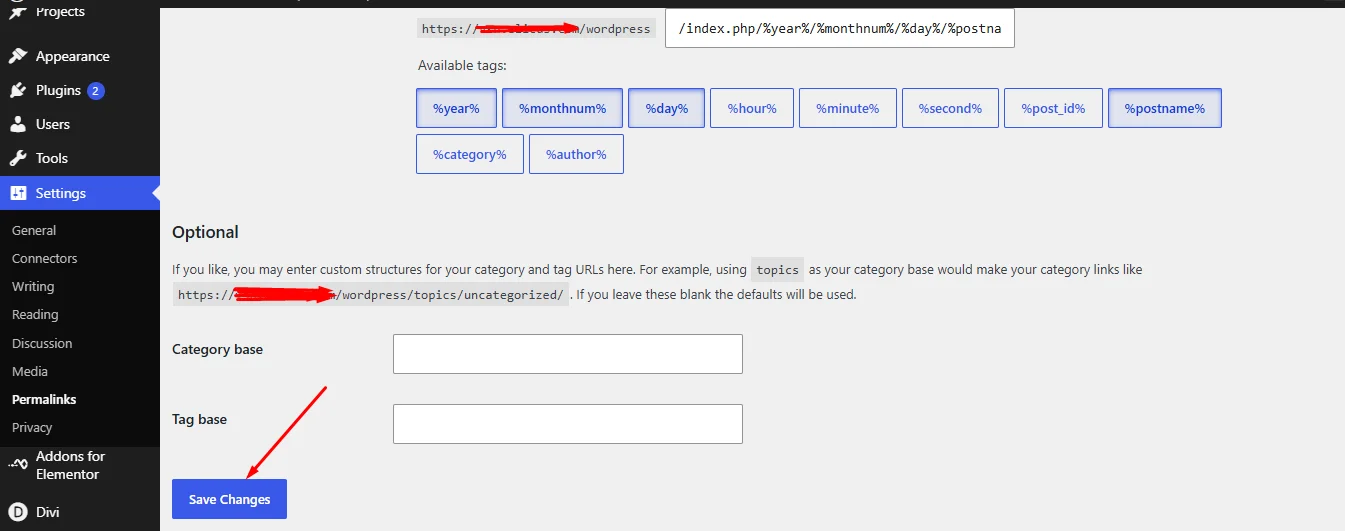
This move regenerates WordPress rewrite rules and often resolves mysterious 404 errors on internal pages.
2. Confirm SSL Is Working
Most hosting providers provide an SSL certificate to secure your website, however, that can change with a hosting shift. Therefore, verify that HTTPS loads correctly, your SSL certificate is active, HTTP redirects to HTTPS, and no browser security warnings appear. If the SSL certificate from the previous hosting is not working, you can activate one from your current hosting.
Scan your website for mixed-content issues, where some assets (such as images, scripts, or stylesheets) are still loading over HTTP.

3. Update Remaining URLs
If you migrate from HTTP to HTTPS, a staging domain, a temporary URL, etc ensure no old URLs remain in your database. It is really key to pay attention to internal links, media URLs, widgets, theme settings, and page builders.
4. Test Email Delivery
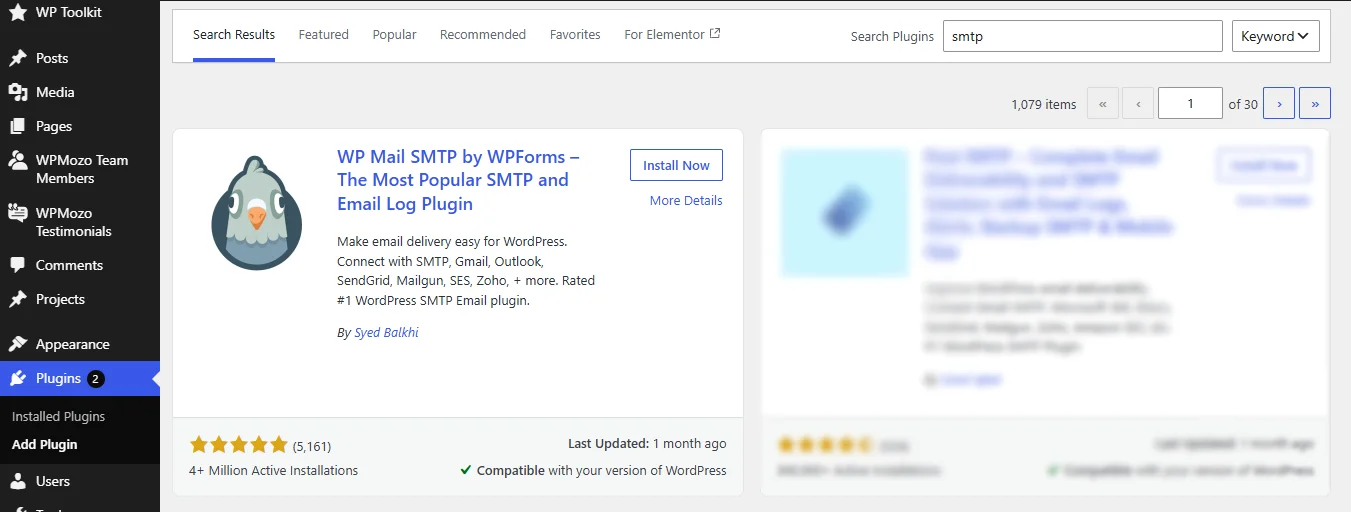
After migration, you also need to check whether email delivery is occurring as needed. Therefore, test contact forms, password reset emails, WooCommerce order emails, membership notifications, and newsletter subscriptions.
In case the email fails, configure an SMTP plugin using your preferred email provider rather than relying on server-generated email.
5. Recreate Scheduled Tasks
For instance, if your previous server used custom CRON jobs, recreate them on the new host. You also need to verify that WP-Cron is functioning correctly and that your server-based cron replacement is executing scheduled tasks. This is important for backups, membership renewals, WooCommerce subscriptions, scheduled publishing, and Cache clearing.
6. Test Critical Site Features
Don't assume your site works because the homepage loads. You also need to check all other features; start with the navigation menus, search, contact forms, user registration, login/logout, password reset, image galleries, comments, etc.
On the other hand, if you have a WooCommerce store, verify that the product pages, shopping cart, coupon codes, checkout, payment gateways, shipping calculations, webhook endpoints, and order confirmation emails are working as expected.
7. Check the WordPress Website Health
To confirm, navigate to Tools> Site Health.
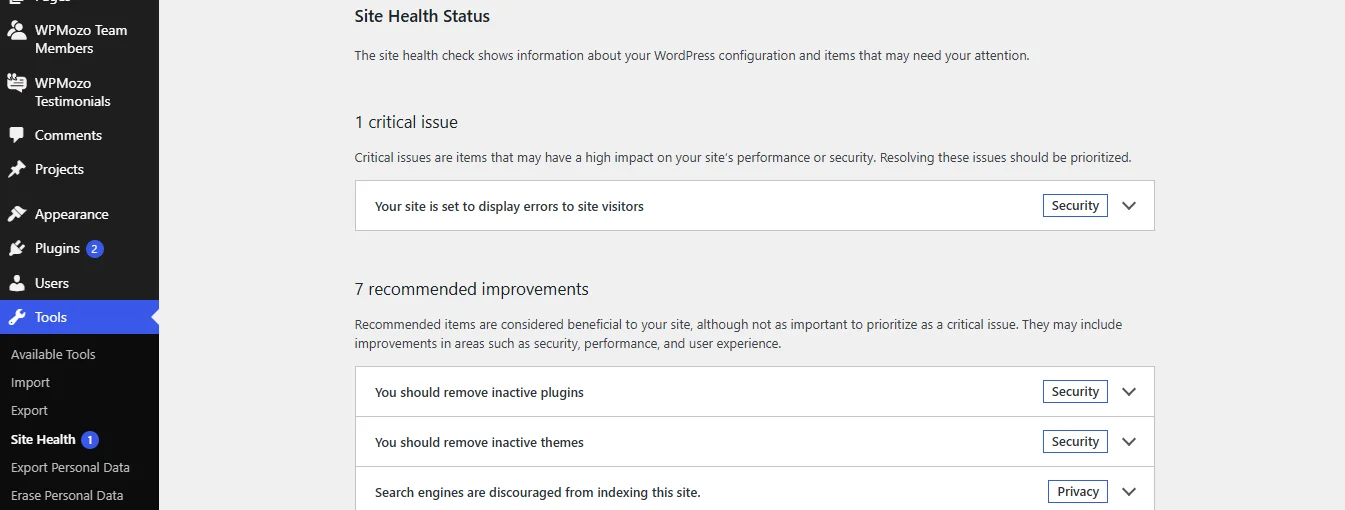
You will get some recommendations; try to fix them to ensure the site functions correctly. While still on it, review all warnings related to PHP extensions, scheduled events, HTTPS, REST API, loopback requests, and file permissions. Resolving the issues will ensure you prevent future issues.
8. General Monitoring for Errors
Just after migration, for at least a week, keep checking the Google Search Console for crawl errors, check your hosting error logs, monitor uptime, review analytics for unexpected traffic drops, and crawl your site with an SEO tool to identify broken links or missing pages. When you discover the issues earlier, it will be easier to solve.
How Best Can You Protect Your SEO During Migration
One of the greatest fears during website migrations is losing search rankings.
1. Keeping the Same Domain And URL Structure
If you are keeping the same domain and URL structure, your SEO should remain intact. This is because no 301 redirects are required; Google treats the move as an infrastructure change rather than a new website, so rankings should remain stable as long as the migration is completed correctly. The key is ensuring that every page, image, and resource is available on the new server before DNS propagation completes.
2. Changing Domains
If you are changing the domain, you should implement 301 redirects from every old URL to its new equivalents, update your XML sitemap, submit the new sitemap in Google Search Console, use Google’s change of address tool, and update internal links where appropriate. Proper redirects will help preserve the authority your existing pages have built over time.
3. Don’t Accidentally Block Search Engines
One major mistake is launching the migrated site with the staging site’s settings still in place. Therefore do some changes before migration.
Check
i) Settings > Reading > ensure discourage search engines from indexing this site is unchecked
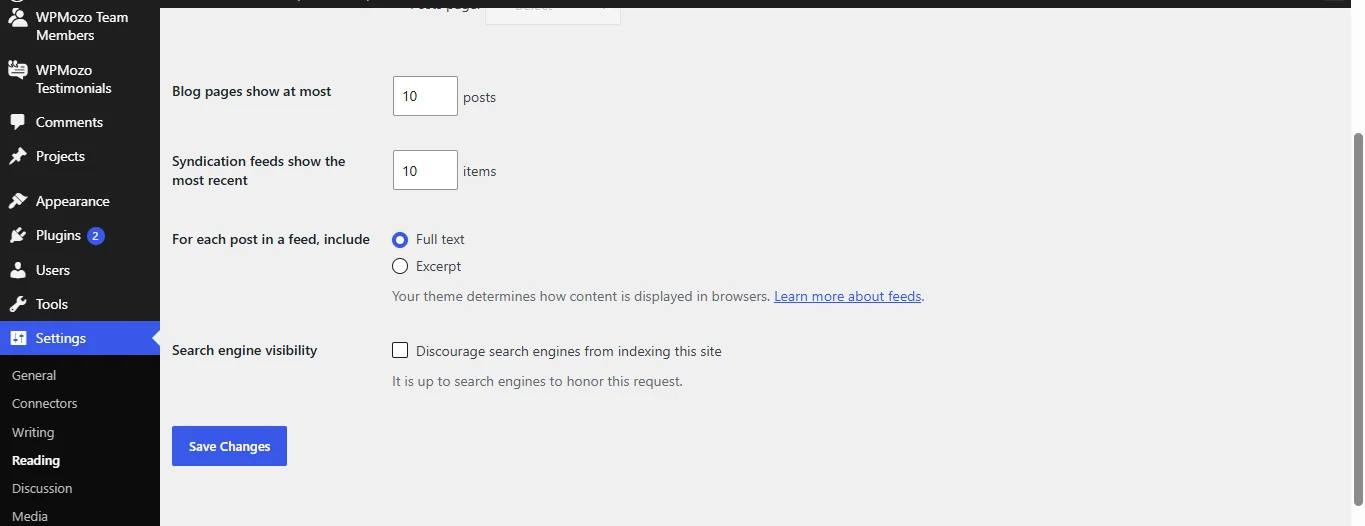
ii) Your robots. txt file doesn’t block important pages
iii) No `noindex` directives remain on production pages.
This step is vital to ensure the search engine crawls your site to ensure the right traffic comes your way.
6 Common WordPress Migration Mistakes
Here are some common WordPress migration mistakes and how to avoid them.
1. Starting Without an Off Server Backup
If you rely solely on your hosting provider’s backup is risky. In case something goes wrong during the migration or the backup is incomplete, recovery may be difficult. Therefore, always create a fresh backup of both your files and database before you begin and save it outside your hosting account.
2. Forgetting DNS and Email Records
When changing hosting or nameservers, overlooking DNS records can interrupt services such as Microsoft 365, Google Workspace, transnational email providers and email forwarding. Therefore, before making any DNS changes, record your existing A, CNAME, MX, TXT, SPF, DKIM and DMARC records so that you can recreate them if necessary.
3. Editing the Live Site During DNS Propagation
DNS propagation takes time; therefore, during the transition some visitors may still reach the old servers while others are directed to the new one. For instance, if new content, customer orders, comments, or form submissions are made on the older server after migration begins, those changes won’t automatically appear on the new server. Therefore, schedule a maintenance window or temporary content freeze.
4. Using Unsafe Search and Replace Methods
One of the ways to break a WordPress website is by running a basic SQL “find and replace” on the database. A standard SQL replacement can corrupt the records, leading to broken widgets, page builder layouts, plugin settings, or even complete site failures. Therefore, consider using the tools that understand WordPress serialization, such as WP-CLI `wp search-replace` or Better Search Replace. They help to update URLs without damaging serialized data.
5. Leaving the Staging Site Hidden From Search Engines
If you discourage search engines from indexing this site while working on a staging copy, and the settings remain enabled after launch, the search engines may stop indexing the production site. Therefore, before completing the migration, verify that the search engine visibility is enabled, your robots. txt file is correct, and no important pages contain unintended noindex directives. This will help prevent SEO issues.
6. Cancelling the Old Hosting Too Soon
Try to avoid cancelling the old hosting too soon. Try to keep the old hosting account for one to two weeks. During the period, you can confirm all traffic is reaching the new server, recover any missed files if needed, compare server configurations, and roll back quickly if an unexpected issue appears.
When to Hire a Migration Service
Most WordPress websites can be migrated using a plugin or manual process; however, there are situations where professional assistance is the safer option. Therefore, consider hiring a migration service if your website includes:
- A WordPress Multisite network
- A WooCommerce store where checkout downtime could impact revenue
- A membership or learning management system with active users
- Several gigabytes of media or a very large database
- Complex server configurations
- A move between different server stacks (such as Apache to Nginx)
- Significant PHP version upgrades
- Business-critical applications where uptime is essential
Professional migration services can also help identify performance bottlenecks during the move, making it an ideal time to optimize your website for faster loading speeds and improved Core Web Vitals.
If you are planning a migration and also want to improve performance, explore Elicus WordPress Development and Website Speed Optimization services. A new hosting environment is a good opportunity to clean up unnecessary plugins, improve caching, optimize images, and fine-tune server settings.
If you're moving from an entirely different content management system such as Drupal, the process involves content mapping, URL planning, redirects, and data transformation. That's a different type of project and is best handled through a dedicated CMS migration service rather than a standard WordPress hosting migration.
Frequently Asked Questions
The migration itself can often be completed within one to two hours for a small website using a migration plugin. However, DNS propagation may take up to 24–48 hours, depending on your DNS provider and TTL settings.
Not if you're only changing hosting providers and keeping the same URLs. Search rankings are typically unaffected by a host-only migration. SEO risks mainly arise when changing domains or URL structures, which require proper 301 redirects and updated sitemaps.
Yes. Many hosting companies include free migrations for new customers. You can also migrate your site yourself using free tools such as Duplicator Lite, All-in-One WP Migration (Free), or Migrate Guru, though available features and limitations vary by plugin and may change over time.
No. If your domain name and page URLs remain the same, redirects aren't necessary. Redirects are only required when visitors need to be sent from one URL to another.
Yes. Keeping your previous hosting account active for one to two weeks provides an important safety net while DNS propagation completes and gives you time to verify that everything works correctly on the new server.
For large or complex websites, a manual migration is often the most reliable approach. Export the database using WP-CLI or phpMyAdmin, transfer files over SFTP, import the database on the new server, update `wp-config.php`, and perform a serialized-data-safe search-and-replace. If downtime isn't an option, consider using a professional migration service.
Conclusion
Migrating a WordPress website doesn't have to be stressful. With the right preparation, it's possible to move your site to a new host with little to no downtime and without affecting your search engine visibility.
The key is to follow a structured process: prepare thoroughly, transfer carefully, verify everything, and only then update your DNS records. Taking time to back up your site, audit your hosting environment, test the new server, and complete a thorough post-migration checklist can prevent the most common issues before they happen.
Whether you choose a hosting provider's migration service, a trusted migration plugin, or a fully manual approach, careful planning is what separates a successful migration from a frustrating one. If your website powers an online store, membership platform, or other business-critical service, investing in professional migration support can provide additional peace of mind and help ensure every detail is handled correctly.


0 Comments